


-7-
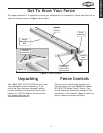
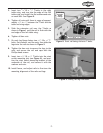
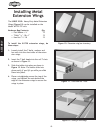
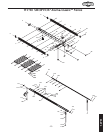
Figure 9. Sliding rail leg into table.
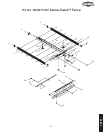
3. Insert two
5
⁄16"-18 x
3
⁄4" T-bolts in the right
table wing, and two into the edge of the left
table wing, and
install the flat washers and nuts
on each bolt. See Figure 8.
4. Tighten all nuts until there is a gap of approxi-
mately
3
⁄16" to
1
⁄4" between the T-bolt and the
table and wing edges.
5. Slide the extension rail over the T-bolts as
shown in Figure 1 until the rail is flush with the
end edge of the left table wing.
6. Tighten all hex nuts.
7. On each leg flange fasten two
5
⁄16"-18 x
3
⁄4" T-
bolts, flat washers, and the nuts; then slide the
legs onto the rails as shown in Figure 9.
8. Tighten the hex nuts to secure the legs to the
rails, and secure the rail end caps with the
Phillips head screws.
9. Insert two
5
⁄16"-18 x
3
⁄4" T-bolts into the start
switch mounting slot (see Figure 8), and posi-
tion the start switch mounting bracket to the
underside of the rail, and secure it with the
washers and nuts.
10. Install fence, and adjust rails to fine-tune the
mounting alignment of the rails and legs.
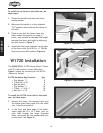
Figure 8. Front rail being slid onto T-bolts.
T-Bolt Gap
Accepts
Fence
Flange
M6-1.0 x 30
T-Bolt
5
⁄16"-18 x
3
⁄4" T-Bolt
Start
Switch
Mounting
Bolt Slot