


ASSEMBLY
-6-
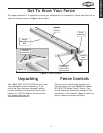
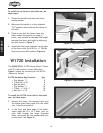
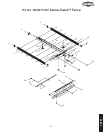
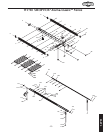
Figure 7. Extension rail inventory
.
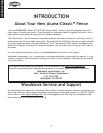
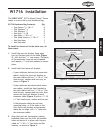
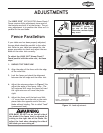
Figure 5.
Adjustment bolt.
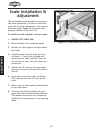
Figure 6.
Scale indicator.
To install the rip fence to the table saw, do
these steps:
1. Thread the handle knob onto the fence
locking handle.
2. Make sure the handle is in the unlocked
“UP” position before placing the fence on
the rails
.
3. Check to see that the fence clears the
table surface throughout its range of
travel, and increase or decrease the height
between the fence and table by adjusting
the bolt shown in Figure 5
.
4. Install the clear scale indicator to the right
of the fence with the #10-24 x
3
⁄8" Phillips
head screws and #10 washers (Figure 6
).
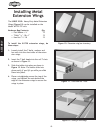
W1720 Installation
The SHOP FOX
®
W1720 Aluma-Classic™ Fence
with 79" rails mounts to most table saws.
Figure 7 shows the inventory for the W1720
(Fence not shown).
W1720 Hardware Bag Contents: Qty
• Flat Washer
1
⁄4" 8
• T-Bolt M6-1 x 30 8
• Hex Nut M6-1 8
• Flat Washer
5
⁄16" 10
• T-Bolt
5
⁄16"-18 x
3
⁄4" 10
• Hex Nut
5
⁄16"-18 10
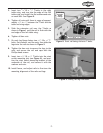
To install the W1720 fence rails to the table
saw, do these steps:
1. Remove the fence, the standard rails, and
the blade guard that came with the table
saw, if they are installed.
2. In the front and back edge of the table,
insert eight M6-1.0 x 30 T-bolts (four on
each side) through the larger threaded
holes, and
install the flat washers and nuts
on each bolt. See Figure 8.
Adjustment Bolt
Scale Indicator