


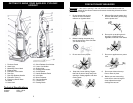


OPERATING INSTRUCTIONS
OPERATING INSTRUCTIONS
Releasing the Handle
Release the handle by placing your foot
on the handle release pedal and pull
back on the handle until it releases from
its upright position. (Fig. 7)
Caution:
•Do NOT
pull the vacuum cleaner
around the room by the hose as it
could tip over and cause damage.
• When using the attachments, be
careful NOT
to overextend the hose
length when reaching. Trying to
reach beyond the hose reach could
cause the vacuum cleaner to tip over.
Fig. 7
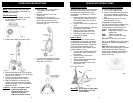
Using the Attachments
Warning:
• Always turn vacuum "Off" before
attaching the accessories.
•Do NOT
place hands or feet
underneath the agitator brush at any
time. When using the attachments,
the agitator brush continues to rotate.
•Do NOT allow the vacuum cleaner to
remain in just one place for a long
period of time as the agitator may
damage the floor surface.
• NEVER place the vacuum cleaner on
furniture, the fringed area of rugs,
deep pile carpeting or carpeted
stairs. The ideal position for the
vacuum cleaner when using any
attachment is for the unit to be on a
level surface with the handle in the
upright position and the carpet height
adjustment lever in HIGH.
Handle Release
Pedal
On/Off
Switch
Fig. 8
1. Place the vacuum cleaner on a flat
surface and move the carpet height
adjustment to HIGH.
2. The crevice tool and the dusting
brush will fit both the extension
tubes and the hose. The dusting
brush will also fit on the end of the
crevice tool. (Fig. 8)
3. The extension tube can be
removed from the inlet hose by
grasping the cuff and twisting while
pulling up.
6
ATTACHMENT USE CHART
CLEANING AREA
ATTACHMENT Furniture
Between
Cushions
Drapes Stairs Walls
DUSTING
BRUSH
****
CREVICE
TOOL
** *
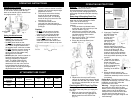
Warning: To reduce the risk of electric
shock, the power cord must be
disconnected before removing the dust
cup, dust cup filter,changing the filters or
performing maintenance/trouble shooting
checks.
Removing & Emptying Dust Cup
The “Dust Cup” must always be emptied
when the dirt level reaches the "MAX
FULL" line on the dust cup.
To remove the dust cup from the
vacuum:
1. Press the dust cup release button
and lift the dust cup out and up of the
vacuum cleaner. (Fig. 9)
2. Hold dust cup container with hand
and turn the dust cup cover counter
clockwise with the other hand to
remove. (Fig. 10)
3. Remove the HEPA "TAP CLEAN"
Filter from the dust cup.
4. Empty the dust cup directly into
dustbin. (Fig. 11)
Fig. 11
Fig. 9
Fig. 10
7
Cleaning the HEPA Dust Cup Filter
We recommend that you "TAP CLEAN"
the HEPA Filter every time you empty the
dust cup.
1. When you have removed the HEPA
Filter from the dust cup, separate the
debris screen from the HEPA Filter.
(Fig. 13)
2. Vigorously "TapClean"
the HEPA dust cup
filter on a hard
surface until no
more dust is
observed falling
out. (Fig. 14)
Alternatively, the
HEPA filter may
also be washed by running it
under the tap allowing the water
to run on the dirty side. We
recommend washing it once a
month or when suction appears
reduced. Always allow 24 hours
for drying before replacing into the
vacuum.
Fig. 14
3. "TapClean" the debris
screen or rinse under a
faucet until clean.
(Fig. 15) Debris screen
must be completely dry
(24 hours) be re-
installing on the HEPA
filter.
Fig. 15
HEPA Filter
with
Debris Screen
Debris Screen HEPA Filter
Fig. 13
Fig. 12
5. Replace the dust cup back into the
vacuum by inserting the bottom first and
tilt back with the dust cup handle. Press
the dust cup release button to lock dust
cup in place.
4. When the debris screen is dry,
replace it on the HEPA filter and re-
install filter assembly into the vacuum.
(not shown)
Please Note: The white material in the
HEPA filter will discolor over time - This is
NORMAL and will NOT affect the
performance of the filter.
Warning: Always empty the dust cup
and clean the HEPA dust cup filter
before each use and during prolonged
usage. Never over fill the dust cup -
remove dirt and clean the HEPA dust
cup filter each time the dust cup is
emptied during prolonged usage or risk
motor damage.