


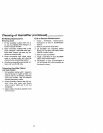
Cleaning Your Humidifier
WARNING: To reduce the risk of
injury, fire or damage to humidifier,
use only cleaners specifically rec-
ommended for humidifiers. Never
use flammable, combustible or poi-
sonous materials to clean your
humidifier. To reduce the risk of
scalds and damage to humidifier,
never put hot water in humidifier.
CAUTION: Local water purity varies
from area to area and under certain
conditions water impurities and air-
borne bacteria may promote the
growth of microorganisms in the
reservoir of the humidifier.
To retard bacteria growth that may
cause odors and be harmful to your
health, use only Sears replacement
filters. We also recommend using
EPA approved bacteriostat, 42-14900
and humidifier cleaner 42-14713,
available at your local Sears store.
NOTE: If it is necessary to use approved
bacteriostat, follow directions correctly.
The bottles of the whole house humidifier
will hold 2-3/8 gallons of water each.
Step 1
To make cleaning easier, the humidifier
cabinet should be empty and completely
dried out. To accomplish this, use the fol-
lowing method:
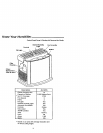
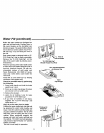
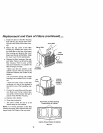
a. On the back side of the humidifier cab-
inet, find the float retainer. In normal
operating mode, the retainer will be
positioned in the bottom of the slot in
the cabinet. Push the retainer up to the
top slot position in the cabinet until it
locks in place. (See "Manual Dryout"
section on page 7.)
b. Allow the humidifier to run until there is
no water left in the cabinet.
c. Unplug humidifier.
WARNING: If humidifier is not un-
plugged, fan could start after housing
is removed.
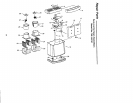
Step 2
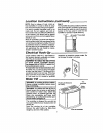
To Remove Parts
a. Open the pivoting lid and remove water
bottles and set aside. Grasp the fan
assembly front center and rear center.
Lift off and set aside on a clean flat sur-
face. The filter housings are now
accessible.
b. Before removing the internal pads of
the humidifier cabinet, we recommend
moving the humidifier to an area where
floor coverings are not susceptible to
water damage, i.e., kitchen or bath
area. Lift the filter housing assemblies
out of the cabinet and set to the side.
c. Remove the water level float from the
humidifier cabinet by pinching the float
retainer to release it from the cabinet.
The cabinet should be empty before
cleaning. The cabinet consists of the
lower areas of the humidifier where the
filters are during normal operation time.
d. Empty cabinet of any remaining water.
e. Proceed to "Bi-Weekly Maintenance"
or "End of Season Maintenance."
f. Remove old filters and dispose of prop-
erly as described on page 9 and 10.
Step 3
Install new filters (purchase the correct
evaporative wicking filter pads 42-14911
for your humidifier) into the location where
the old filters were positioned. Install the
filter housings with the new filters into the
correct location. Reinstall the water level
float. NOTE: Float retainer should be posi-
tioned in normal operating mode. Assure
that it is positioned in the bottom of the slot
in the back of the cabinet. (See page 7 for
diagram of slot.) Position the fan assembly
on top of the cabinet and return the humid-
ifier to the desired location for use.
Refill humidifier bottles with fresh cool water
and return them to the cabinet. Plug the unit
into a 120 volt A.C. power outlet and set the
controls per the "Operating Humidifier
Controls" section of this manual.
11