


SECTION 3 CAREOFYOURFILTER
[ I
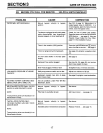
3C. REPLACING MINERAL... TASTE & ODOR FILTER
Average life of the activated carbon mineral bed is
about 1 year (see page 12). It's time to replace the
bed when the tastes and/or odors begin to return in
the water supply. Do the following.
STEPS TO REPLACE MINERAL
=
=
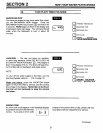
Press the face plate BACKWASH NOW
button [] and hold for 3 seconds, until RCHG
begins to flash in the display.
When water begins to flow from the valve drain
hose, place the bypass valve(s) in BYPASS
position.., see FIG. 8, page 18.
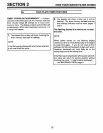
CAUTION:
BE SURE TO DO STEPS 1AND2AS INSTRUCTED,
TO RELIEVE WATER PRESSURE IN THE TANK.
=
4.
=
Unplug the transformer at the wall outlet.
Carefully, pull the 2 clips (key #41, page 26) at
the inlet and outlet fittings. Slide the adaptors, or
bypass valve, from the filter valve.
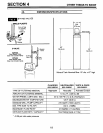
Referring to FIG. 7, page 14, remove the clamp
retainers (2) and clamp sections (2) that hold the
valve to the tank. Lift upward to remove the
valve.
g
=
Remove the o-rings (3) and top distributor from
the top of the tank.
Next to a floor drain, carefully tip the tank over,
catching the used carbon in a burlap sack or
other suitable container. Remove the bottom
distributor assembly, and flush the inside of the
tank with water.
.
Stand the tank upright and replace the bottom
distributor assembly. Temporarily, plug the top
end of the distributor (use rag, etc.) to prevent
accidental mineral spills into it.
1
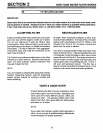
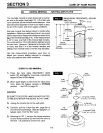
Using a large neck funnel (FIG. 6), first add 17
Ibs. of gravel, followed by 10 Ibs. of filter sand.
Next, add the 1 cu. ft. of activated carbon. Use
water sparingly to assist carbon flowthrough the
funnel.
NOTE:
Be sure the bottom distributor is centered in the tank
while adding mineral.
10.
11.
12.
13.
14.
15.
Use water to flush the tank top opening. Then,
replace the top distributor and 3 o-rings. Be sure
to locate o-ring seals correctly... FIG. 7, page
14.
Carefully, install the valve assembly and retain-
ing clamps. DOUBLE-CHECK TO BE SURE
CLAMPS AND RETAINERS ARE SECURELY
FASTENED IN PLACE.
Referring to your installation manual, reconnect
the filter to the plumbing. BE SURE THE PLUMB-
ING IS HELD FIRMLY IN PLACE, INTHE VALVE
INLET AND OUTLET.
Place the valve drain hose at the drain point and
secure in place.
Return the plumbing bypass valve(s) to SERV-
ICE position.
Plug the transformer into the wall outlet. The
filter will complete the backwash cycle, started in
step 1, and will automatically return to service.
CAUTION:
HANDLE THE TANK CAREFULLY. FULL OF WATER
AND CARBON, IT IS VERY HEAVY. DO NOT
ATTEMPT TO LIFT IT BY YOURSELF. DO NOT
DROP AND BREAK THE TANK.
NOTE:
All new carbon mineral contains some smaller than
normal particles called "fines." Backwashing the filter
removes the fines. If, after the backwash in step 15
is over, fines are still in the filtered water, repeat step
1 for added backwashing.
16