


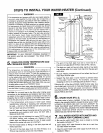


BEFORE YOU CALL FOR SERVICE
WARNING -
/
TO GUARD AGAINST SEVERE BURNS OR POSSIBLE FATALELECTRICAL SHOCK, /
BE SURE TO TURN OFF ELECTRICAL POWER TO THE WATER HEATER BEFORE REMOVING ANY PANELS,
J
HELPFUL HINTS CHECKLIST
If your water heater fails to work right, make the following easy checks. Often, you will find what's wrong yourself and you won't
have to call and wait for service and hot water. If you do not find what's wrong when making the checks, then call for service.
PLEASE READTHE WARRANTYNOTES ON PAGE 16.
A. NOT ENOUGH OR NO HOT WATER
1. Used more hot water than the water heater holds, or faster than the water heater can heat the water.
2. Hot water wastedthrough leaking or partially open faucet.
3. If the water heater is newly installed, check the Installation Steps to be sure it's installed correctly
(THIS ISA 240V WATERHEATERAND MUST BE WIRED TO A 240V SUPPLY).
4. Make sure the electrical supply is turned on and that the cold water supply valve is fully open.
5. Check for a blown fuse or popped circuit breaker (circuit breakers weaken with age and may not handle the rated load).
6. During winter months, the colder supply water takes longer to heat.
7. The temperature limitswitch (Page10) may have opened the circuit ff water temperature reached the maximum limit.
8. Temperature controls for the heating elementsset too low (Page 9).
9. Possible burned out element(s).
B. WATER TOO HOT
1. Temperaturecontrolsfor the heatingelementsset too high (Page9).
2. Temperaturecontrolthermostat not working.
C. WATER LEAKS
NOTE: Always checkfor condensation firstas the source of the "leak". Wipe allwet surfaces dry and check again.Also, the ..,
temperature and pressure relief valvemay have opened to vent highpressure or temperature.Pointsto check on the water '
heater for possibleleaksareas follows.
CAUTION: TURN OFF ELECTRICALPOWER IF YOU WILL REMOVE THE ACCESS PANELS. Before repairinga leak,turn off
the water supplyand drain thetank (seePage 10).
1. Inletand outletfittings.
2. Temperatureand pressure relief valveconnection,or thevalve itself(see Pages4 and 6).
3. Drain valve,or drainvalvethreads to tank.
4. Gaskets around heating element(s).
lair] _
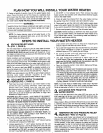
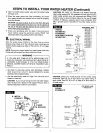
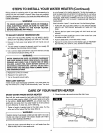
NOTE: Improperly installed heat traps could cause reduCed
or restricted water flow (seePages 4 and 5).
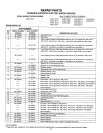
HEAT TRAP INSTALLATION
Install on Water Heater
Outlet (HOT} Side
ASShown Pink In=ert
Hot Side Trap
Water Flow OirectiQn
Install on V_ater Heater
inlet (COLD) Side
As Shown
Inse_
1_x3/4" Reducer
(included)
Water
)irection