


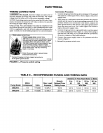

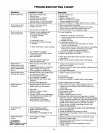


TROUBLESHOOTING CHART
PROBLEM POSSIBLE CAUSES REMEDIES
Motor will not run. 1. Disconnect switch is off. 1. Be sure switch is on.
2. Fuse is blown. 2. Replace fuse.
3. Starting switch is defective. 3. Replace starting switch.
4. Wires at motor are loose, 4. Refer to instroctions on wiring.
disconnected, or wired incorrectly. Check and tighten all wiring.
5. Pressure switch contacts are dirty. 5. Clean by sliding piece of plain paper between contacts.
Motor runs hot and 1. Motor is wired incorrectly. 1. Refer to instructions on wiring.
overload kicks off. 2. Voltage is too low. 2. Check with power company. Install heavier wiring
if wire size is too small. See wiring instructions.
3. Pump cycles too frequently. 3. See section below on too frequent cycling.
Motor runs but no 1. In new installation:
water is delivered.
Pump does not
deliver water to full
capacity (also check
point 3 immediately
above).
Pump pumps water
but does not shut off.
Pump cycles too
frequently.
Air spurts from
faucets.
Leaks at the metal
damps.
AWARNING]
Release all pressure in system
before working on clamp.
1. Pump in a new installation did
not pick up prime through:
a. Improper priming.
b. Air leaks.
c. Leaking foot valve.
2. Pump has lost its prime through:
a. Air leaks.
b. Water level below suction of pump.
3. Jet or impeller is plugged.
4. Check valve or foot valve is stuck
in closed position.
5. Pipes are frozen.
6. Foot valve and/or strainer are
buried in sand or mud.
1. Water level in well is lower than
estimated.
2. Steel piping (if used) is corroded or
limed, causing excess friction.
3. Offset piping is too small in size.
1. Pressure switch is out of adjustment
or contacts are "frozen".
2. Faucets have been left open.
3. Jet or impeller is clogged.
4. Water level in well is lower than
estimated.
5. Motor is wired incorrectly.
1. Standard pressure tank is water-
logged and has no air cushion.
2. Pipes leak.
3. Faucets or valves are open.
4. Foot valve leaks.
5. Pressure switch is out of adjustment.
6. Air charge too low in Captive
Tank. Model 390.2514
and Model 390.2518 require
40 pounds for proper operation.
1. Pump is picking up prime.
2. Leak in suction side of pump.
3. Well is gaseous.
4. Intermittent over-pumping of well.
1. Loose clamps or O-Ring
not sealed.
a. Re-prime according to instructions.
b. Check all connections on suction line, air volume
control, and jet.
c. Replace foot valve.
2. In installation already in use:
a. Check all connections on suction line, air volume
control, jet and shaft seal.
b. Lower suction line into water and re-prime. If receding
water level in a shallow well operation exceeds
suction lift, a deep well pump is needed.
3. Clean jet or impeller according to instructions.
4. Replace check valve or foot valve.
5. Thaw pipes, Bury pipes below frost line. Heat pit or
pump house.
6. Raise foot valve and/or strainer above well bottom.
1. A deep well jet pump may- be needed
(over 20 ft. to water).
2. Replace with plastic pipe where possible, otherwise with
new steel pipe.
3. Use larger offset piping.
1. Adjust or replace pressure switch.
2. Close faucets.
3. Clean jet or impeller.
4. Check for possibility of using a deep well jet pump.
5. Refer to instructions on wiring.
1. Drain tank to air volume control tapping. Check air
volume control for defects. Check for air leaks at any
connection.
2. Check connections.
3. Close faucets or valves.
4. Replace foot valve.
5. Adjust or replace pressure switch.
6. Disconnect electrical power and open faucets until all
pressure is relieved. Using automobile tire pressure gauge,
check air pressure in tank at the valve stem located at top
of tank. If air pressure is lower, pump air into tank from
outside source, until proper air pressure is reached.
Check air valve for leaks, using soapy solution, and
replace core if necessary.
1. As soon as pump picks up prime, all air will be ejected.
2. Check suction piping.
3. Change installation as described in manual.
4. Lower foot valve if possible, otherwise restrict discharge
side of pump.
1. Release all system pressure before working on clamp.
2. Check that clamp is tight.
3. Tap around clamp with hammer on a wooden block.
Retighten clamp screw.
4. Check O-Ring for proper seating and/or dirt on
O-Ring or seat.
12