


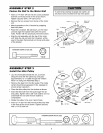

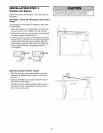

ASSEMBLY STEP 2
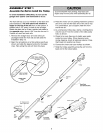
Fasten the Rail to the Motor Unit
• Insert a 1/4"-20xl-3/4 bolt into the cover protection
bolt hole on the back end of the rail as shown.
Tighten securely with a 1/4"-20 lock nut.
• Remove the two screws from the top of the motor
unit.
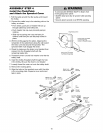
• Attach spreaders to the U bracket by snapping
them into place.
• Place the U bracket, flat side down, on the motor
unit and align the bracket holes with the screw
holes. Fasten with the previously removed screws.
• Align the rail assembly with the top of the motor
unit. Slide the rail end onto the U-bracket, all the
way to the stops that protrude on the top and sides
of the bracket.
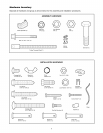
HARDWARE SHOWN ACTUAL SIZE _'_P'_'_'_"t
Lock Nut
Boit 1/4"-20 x 1-3/4 1/4"-20
To avoid serious damageto garage door opener, use
only those screws mounted in the top of the opener.
Boll
Screws Motor Unit
Sprocket
/
"U" Bracket
Cover
ON TOP AND SIDES
OF BRACKET
"Lock Nut
dook Spreader
into Back Slots,
then Snap Tab
into Front SIot
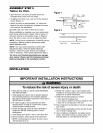
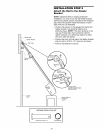
ASSEMBLY STEP 3
Install the Idler Pulley
• Lay the chain/cable beside the rail, as shown.
Grasp the end with the cable loop and pass
approximately 12" of cable through the window.
Allow it to hang until Assembly Step 5.
• Remove the tape from the idler pulley. The inside
center should be pre-greased. If dry, regrease to
ensure proper operation.
• Place the idler pulley into the window as shown.
• Insert the idler bolt from the top through the rail
and pulley. Tighten with a 3/8" lock washer and nut
underneath the rail until the lock washer is
compressed.
• Rotate the pulley to be sure it spins freely.
• Insert a 1/4"-20xl-3/4 bolt into the trolley stop hole
in the front of the rail as shown. Tighten securely
with a 1/4"-20 lock nut.
Chain and
Cable
Locking Pliers
Idler
Bott Trolley
Stop Hole
\
3/8"Lock I
Washer_
_1 3/8" Nut
I
Boll
Trolley
Stop Hole
insidePulleyPulley _:
_ Cable Loop idler Pulley
HARDWARE SHOWN ACTUAL SIZE
©
Idler Boit Bolt 1/4"-20 x 1-3/4))))))')')'))'))Lock Nut 1/4"-20
Nut3/8" Lock Washer3/8"
9