


Touch Code Lock
NIodel 139.53716
KEYBOARD
o
n
CONSOLE
The Touch Code Lock consists of a keyboard and a console The keyboard sends a coded signal from outside the garage
The console fastens to an inside garage wall it receives the 4-digit programmed coded signal and _tarts the door opener
The Touch Code Lock will work with most Genie "Push Twice to Operate" openers if you press any other digit after
you enter the 4-digit programmed code°
NOTE: CABLE CONNECTOR HOLE IS LOCATED ON LEFT SIDE OF CONSOLE IF POSSIBLE, INSTALL TOUCH CODE LOCK ON LEFT
SIDE OF GARAGE (DETERMINED BY FACING GARAGE FROM OUTSIDE) IF INSTALLED ON RIGHT SIDE OF GARAGE, CABLE MUST
BE ROUTED OVER OR UNDER CONSOLE
FEATURES OF THE DIGITAL TOUCH CODE LOCK
Personalized Code: 10,000 possible combinations Code
can be changed easily if desired
Operation: Opener activates when programmed code is
entered on the keyboard
The user has 10 seconds from the time the first number
is pressed to enter the 4-digit code
If incorrect numbers are accidentally pressed, a 5 second
interval is necessary before starting over.
Power Supply: Operates from the garage door opener
power with a battery b&ck-up for code memory and light-
ed keyboard Unit wiU not operate without battery
Installation: Simple to install in 5 easy steps
Console: Provides an additional push button controt to
operate door from inside garage
Keyboard; Thegarage door can be operated after a valid
code entry by pressing ANY single key AS LONG AS THE
KEYBOARD LIGHT REMAINS ON..
Keyboard Illuminates and remains lit for 10seconds when
ANY number is pressed in darkness this feature allows
user to press ANY number before entering the 4-digit code
IMPORTANT NOTE: When illumination is needed,
avoid pressing keyboard area which contains the first
code number.
DISCONNECT THE POWER TO THE GARAGE DOOR OPENER BEFORE BEGINNING INSTALLATION.
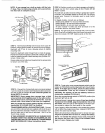
STEP 1--SECTIONAL DOORS: Draw two intersecting lines
on garage jamb face--horizontally at eye level and vertically
as close to centedine as possibfe Make sum there is at least
1-t/4" clearance on each side of the vertical line. Drill a
1" diameter hole through the jamb at marked location.
Refer to illustration on Side 2 if your garage has a built_
up jamb.
Keyboard
Optional
Location
PARTS LIST
Conso}e Assembly 41D2940
Keyboard Assembly ,HD2952
9 Volt Battery 10A13
2 Strand Betl Wire , , , 219A276
Transformer Kit (inc bel! wire) 41A3468
Side 1
STEP 1--ONE-PIECE DOORS: install the keyboard on the
exterior front wal! of a FRAME garage Position it away from
the door opening to avoid injury as door swings out and up
Drill a 1" diameter hole through wall at eye level Refer to note
below; then proceed to Step 2
Garage
riot
Doer Jamb
Edge
NOTE: If garage is Constructed of material other than
wood (brick, stone or aluminum siding), install keyboard
on door jamb with this important exception: LOCATE KEY-
BOARD ON OUTSIDE EDGE OF DOOR JAMB TO AVOID
INJURY AS DOOR SWINGS OUT AND UP_
NO USER SERVICEABLE PARTS.
For repair, contact a SEARS Service Center