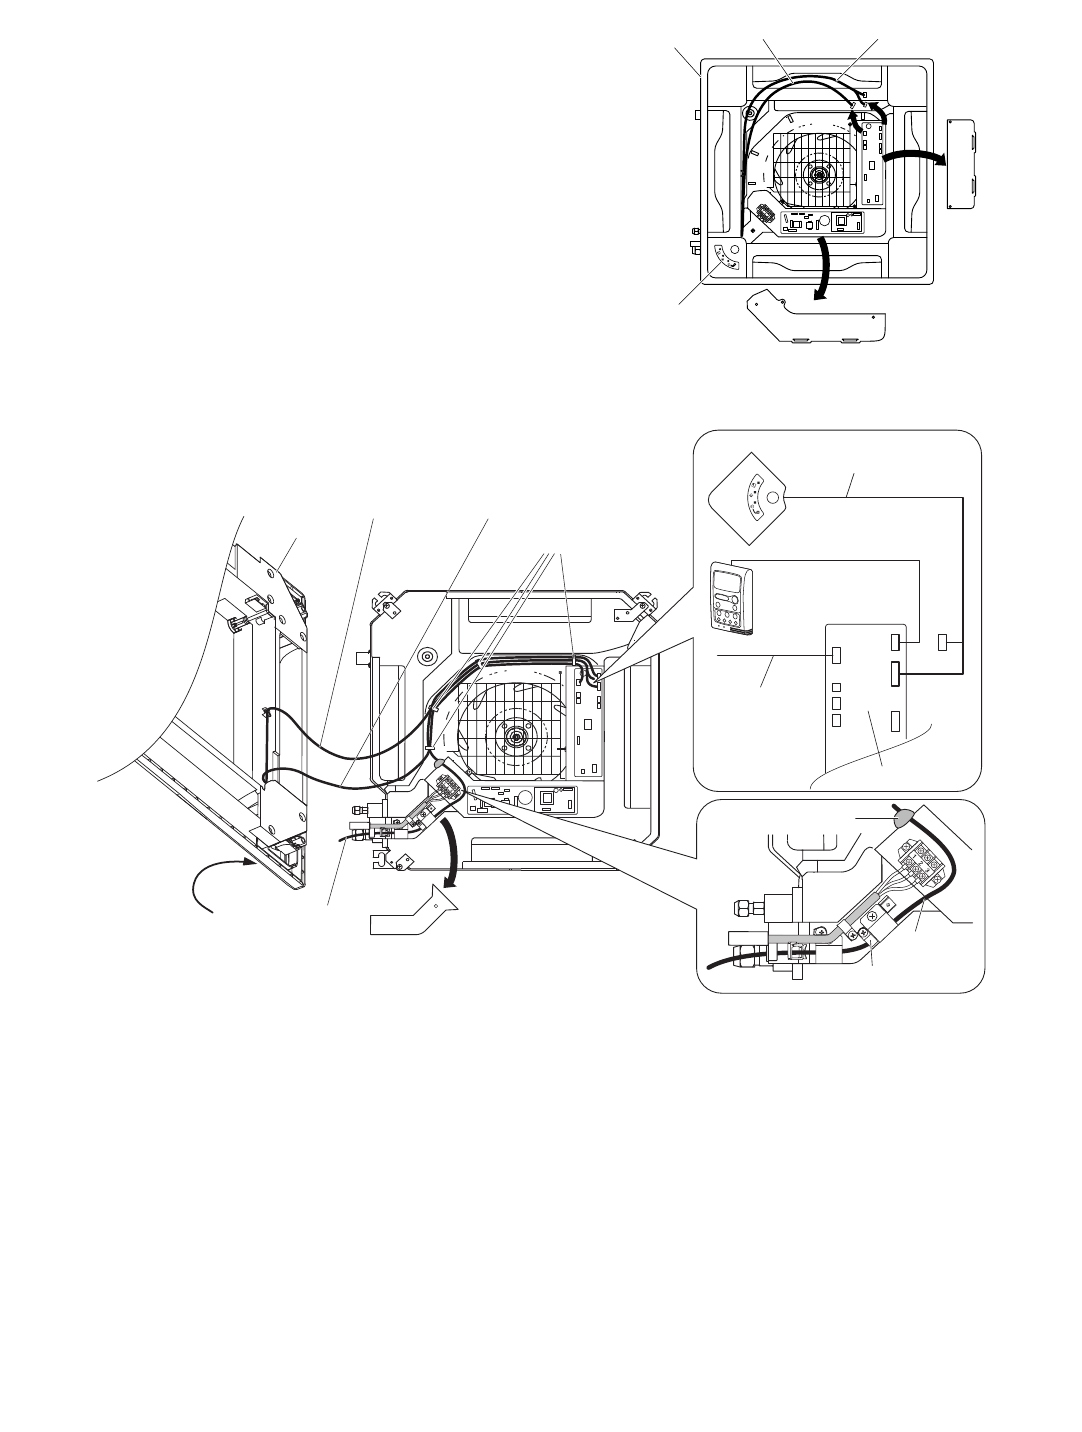
Fig. 8
Indicator
Wire harness
Ceiling
panel
Terminal cover
Clamps
7P IND and 4P RC
wiring connector
5P FLAP
wiring connector
Clamping strap
FLAP
RCIND
7P
4P
5P FLAP
wiring
connector
Wire harness
Remote
controller
Wire harness
Control PCB
Indicator
7P IND and 4P RC
wiring connector
Putty
3
■ How to wire the remote controller
(1) Turn OFF the power and remove the ceiling panel
air-intake grille. (Refer to 3-6-1 Before Installing the
Ceiling Panel in the Installation Instructions supplied
with the indoor unit.)
(2) Remove the 3 power box cover screws and 2 control
box cover screws, then remove both covers. At this
time, take care not to drop the covers. (Fig. 7)
(3) Disconnect the 7P (IND) terminal and 4P (RC) termi-
nal of the 7P IND and 4P RC wiring connectors and
the 5P terminal of the 5P FLAP wiring connector
from the control box PCB connectors (IND, RC,
FLAP). Disconnect each wiring connector from the
clamp that fastens it. (Fig. 7)
(4) Remove the ceiling panel. (To remove the ceiling
panel, follow the steps for 3-6 How to Install the
Ceiling Panel in the reverse order. Refer to the
Installation Instructions supplied with the indoor unit.)
(5) Remove the terminal cover screws, then remove the cover. At this time, take care not to drop the cover. (Fig. 8)
(6) Pull in the wire harness from the remote controller as shown in Fig. 8-b.
• Remove the putty before wiring. After wiring, make sure to restore the putty.
(7) Insert the wire harness 4P terminal into the control box PCB connector (RC). (Fig. 8-a)
(8) Install the terminal cover. Then install the ceiling panel. (Refer to 3-6 How to Install the Ceiling Panel in the
Installation Instructions supplied with the indoor unit.)
(9) Insert only the 7P (IND) terminal of the 7P IND and 4P RC wiring connector into the connector (IND) on the control
box PCB. Store the 4P terminal inside the control box. (Fig. 8-a)
(10) Next, insert the 5P terminal of the 5P FLAP wiring connector into the connector (FLAP) on the control box PCB.
(Fig. 8-a)
(11) When the connections are completed, fasten the wire harness and each wiring connector with the clamps.
(12) Install the power box cover and control box cover.
(13) Install the air-intake grille. (Refer to 3-6 How to Install the Ceiling Panel in the Installation Instructions supplied
with the indoor unit.)
Fig. 7
Fig. 8-a
Fig. 8-b
Ceiling
panel
5P FLAP
wiring connector
7P IND and 4P RC
wiring connector
Control
box
cover
Power box cover
Indicator
09-027 STK-RCS-7TWSUA 3/10/09 12:46 PM Page 3


