


6
7. Replace Cup
and Swing
Lid Shut
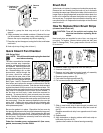
5. Remove
Cup
6. Empty
Cup
5. Reach in, grasp the dust cup and pull it out of the
support.
6. Empty contents in a suitable container. (If desired, the cup
can be washed in warm water using a mild soap solution.
Be sure the cup is completely dry before replacing.)
7. Place the cup into the support, swing the lid shut, and fasten
each latch.
8. Hook clip to top of bag (refer to item 1).
Quick Kleen® Fan Chamber
(880 Series Only)
NOTE: Turn off the switch and unplug the electrical
cord before cleaning.
The clear, removable fan chamber
cover provides easy inspection,
cleaning, and maintenance of the
fan chamber. Removing the cover
provides easy access to the motor
fan. Grease buildup, dirt, or other
obstructions, visible through the
fan cover, should be removed.
To clean the fan area, take off the
chrome bottom plate by releasing
the two cam locks (see Brush Roll
Belt, Figure 1 and 2). Remove the belt from the motor pulley,
then loosen and remove the screws on either side of the fan
cover, as indicated by the arrows. Push the cam locks outward
against the wheels to lift the cover from the cleaner base. Dirt
and obstructions can easily be cleared; however, caked grease
may need to be scraped from the cover and the cleaner. If
the fan does not turn freely, it also should be removed for
cleaning. To remove the fan, place a wrench over the motor
pulley. Hold the fan blades with one hand and turn the wrench
counterclockwise. Remove the motor pulley and lift the fan off
the motor shaft. Clean the area and replace the fan over the
motor shaft. Tighten the motor pulley snugly clockwise with
the wrench. If necessary, replace the fan cover or the gasket
with replacement parts.
Be sure the gasket is in place. Reposition the fan cover by
first placing the exhaust end into place between the large rear
wheels. Seat the fan cover firmly. Next replace the belt and
bottom plate as the pressure from the bottom plate helps seal
the fan cover. Start the two screws by hand to be sure they
are straight, then tighten.
Order fan chamber cover replacement kit (fan cover,
gasket, two screws) Part No. 52334.
A B C D
F
E
D
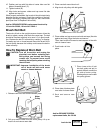
TO RE-ASSEMBLE
7. Slide in new brush strip of same length (rounded end
first) Fit track on either side of brush strip into brush roll
slot (F).
Replace second brush strip from opposite end of brush
roll (E).
8. Replace shaft
9. Align indentation on bearing retainer with brush strip on
both ends of brush roll (D).
(replace shaft washer on sleeve bearing assembly)
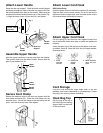
1. Remove rubber end cap cover from one end (A).
2. Unscrew locknut (B).
3. Remove end cap (sleeve bearing brush roll assembly
includes a shaft washer, not pictured) (C).
4. Remove bearing retainer (D).
5. Push shaft through opposite end (E).
6. Pull out worn brush strip with pliers (F).
How To Replace Worn Brush Strips
(chromed steel brush roll)
CAUTION: Turn off the switch and unplug the
electrical cord before replacing brush
strips.
New brush strips are supplied in sets of two, one long and
one short. To replace, remove bottom plate and belt (see
How To Change Belt). Then, grasp center of brush roll and
lift to remove.
Brush Roll
As the brush roll rotates, it sweeps and combs the carpet nap.
Remove hair and threads from the brush roll so it continues
brushing the carpet nap. When the bristles of the brush roll no
longer touch a straight edge held across the bottom plate, the
brush roll is ineffective because the bristles no longer touch
the carpet nap. To maintain the most effective cleaning, use a
new wood brush roll. Replace the brush strips on the chromed
steel brush roll.