


E-
13
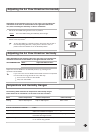
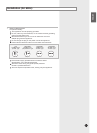
Installation of the Drain Tube
Fix the d
rain tube as shown in the figure.
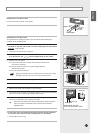
Installation of the Drain
Pan
The procedure
for installing the drain pan should be determined by the
condition of the installing area.
1 Open the front
grille; refer to page 9.
3 Rem
ove the front panel.
4 Remove two screws on the lower, right and left sides of the unit.
5 Remove the chassis from the cabinet.
6 Remove the rubber cap inserted into the basepan.
7 Fix the drain pan as shown in the figure, and then connect the drain hose.
(You can use any commercially-available drain hose.)
8 Install the cabinet at the specified area after installing the drain pan,
and then re-assemble it in the original condition.
1
Follow steps 6 and 7 only
2 Remove the screw located at the lower section of the front grille.
It is secured in the section depending on the model.
In the case of an area where the drain pan can not be direct
ly
installed on the rear side of the unit after installing the air conditioner.
Example
: High storage
In the case of an area where the drain pan can be directly installed
on the rear side of the unit after installing the air conditioner.
3-1 Press both sides of the cabinet in the direction of the arrow
as shown in the figure.
3-2 Pull the l
ower part of the front panel slightly forward.
(below three inches)
3-3 Lift the front panel up
ward.
Applying
excessive force to remove the front panel may cause
damage to the tab; be sure not to use excessive force.
Secure the front panel to the case
by replacing the screw removed in
step 2. If a screw not removed in step 2. secure the panel with a
supplied screw.
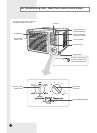
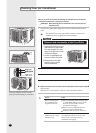
Rubber cap
Screws(2EA)
Gasket
Rear
Drain Tube
Bottom-Side View with
Drain Pan and Hose in Place
Rubber cap
Drain Hose
Rear
Drain Pan
Screw
HSILGNE