


RV53i & RV53e Operation and Installation Manual 15
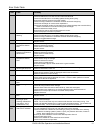
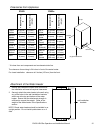
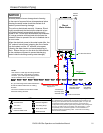
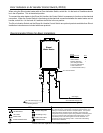
Clearances from Appliance
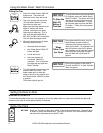
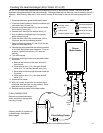
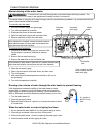
1. Identify the installation location and confirm that
the installation will meet all required clearances.
2. Securely attach the water heater to the wall using
any of the holes in the wall installation brackets
which are at the top and bottom of the water
heater. Ensure that the attachment strength is
sufficient to support the weight. Refer to the
weight of the water heater in the Specifications
section.
NOTE: Rinnai water heaters should be installed in an
upright position. Do not install upside down or on it
side.
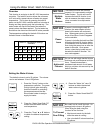
Attachment of the Water Heater
wall installation
brackets
to
Combustibles
to Non-
Combustibles
Top of
Heater
6 inches *
(152 mm)
2 inches *
(51 mm)
Back of
Heater
0 (zero) 0 (zero)
Front of
Heater
6 inches
(152 mm)
6 inches
(152 mm)
Sides of
Heater
2 inches
(51 mm)
1/2 inch
(13 mm)
Ground/
Bottom
12 inches
(305 mm)
12 inches
(305 mm)
Vent
0 (zero) 0 (zero)
The clearance for servicing is 24 inches in front of the water heater.
For closet installation: clearance is 6 inches (152 mm) from the front.
* 0 inches from vent components and condensate drain line.
to side
to front
to top
to ground/bottom
to
Combustibles
to Non-
Combustibles
Top of
Heater
12 inches
(305 mm)
2 inches
(51 mm)
Back of
Heater
0 (zero) 0 (zero)
Front
(Panel)
24 inches
(610 mm)
0 (zero)
Sides of
Heater
6 inches
(152 mm)
1/8 inch
(3.2 mm)
Floor/
Ground
12 inches
(305 mm)
2 inches
(51 mm)
Front
(Exhaust)
24 inches
(610 mm)
24 inches
(610 mm)
RV53i RV53e