


Installation & Servicing Instructions Rinnai E-Series
11
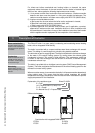
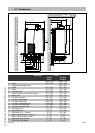
5.2 Fitting the boiler
- Remove the packaging materials.
- Lay the boiler on its back during unpacking. Remove the casing from the
boiler. This part can be left apart during installation. It must be placed on the
boiler and xed with the screw behind the door and in the 4 quick releases
before the boiler is started up.
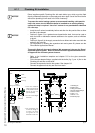
Turn the boiler to its side and remove the wall bracket from the back of the
boiler by removing the 2 screws.
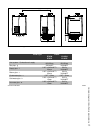
The boiler can be mounted practically to any wall with the suspension bracket and the
enclosed mounting equipment.
- The wall must be at and of sufcient strength in order to be able to securely hold
and support the boiler weight with its water content.
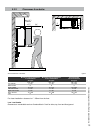
- Take note of the necessary space around the boiler for installation of venting
system, pipework and servicing. See drawing on pages 12 to 15.
The location of the boiler can be determined by using the template supplied with the
boiler documentation. Remember to account for the spacing of the plumbing kit.
- Drill the necessary holes using the template
- Install the mounting bracket to the wall using the supplied mounting materials
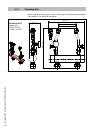
Lifting and carrying precautions:
To avoid personal injury please follow these recommendations:
- Always lift the boiler with 2 people or use special equipment.
- When lifting the boiler, bend the knees, and keep the back straight and feet
apart.
- Do not lift and twist at the same time.
- Lift and carry the boiler close to the body.
- Wear protective clothing and gloves to protect from any sharp edges.
Lift the boiler only by the boiler's rear wall.
- Dispose the packaging materials.
!
CAUTION
NOTICE
i
NOTICE
i
!
WARNING