


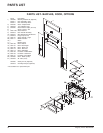

Regency Z2510 WarmHearth18
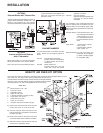
Top View
Top View
INSTALLATION
Top View
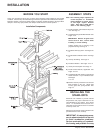
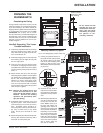
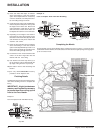
4) Place side metal filler strips in between
stove and framing to cover the stand-off
space. Fit the strips behind "A" so that they
cover the stand-offs, and will prevent mor-
tar from falling through the mesh.
5) Center door arch edge, mark and drill holes.
Note the top of the side pieces meet up with
the edges of the center arch. Attach arch
edge and bottom of grill edge to unit. The
door arch floats at each end so that it can
be adjusted to match the curve of the door.
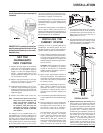
6) Depending on the height of the hearth in
front of the unit, it may be necessary to trim
the bottom of the mesh sides (B) to fit. Mark
and drill holes for side pieces. Attach with
washers and screws.
7) Place the top metal filler strip in between
stove and framing to cover the stand-off
space. Fit the strips behind Top mesh "C" so
that it covers the stand-off, and will prevent
mortar from falling through the mesh.
8) Put the door on the unit and check that the
veneer on the door hinge side does not
interfere with the door swing.
9) Use washers and screw top mesh (C) to
top of grill frame. This is attached with the
top edge of the grill frame on piece (B).
10)Now fasten mesh to wall sheathing and
blend in.
11)Use only non-combustible masonry
products to finish fireplace front.
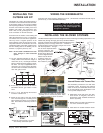
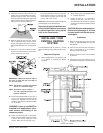
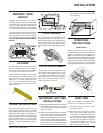
Finishing Details
Consideration must be given to fireplace place-
ment when deciding on how to complete the
facing.
IMPORTANT: A tight joint between
masonry and fireplace is necessary
to prevent heat from rolling up the
front to the Face Header.
Example 1:
Face of Fireplace Flush with Wall Framing.
Example 2:
Face of Fireplace Flush with Wall Sheathing.
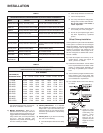
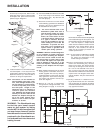
Completing the Mantle
A stone mantle may be placed directly above or below the warm air outlet. If a wood or other
combustible mantle is desired, it must be at least 18 inches above the grill opening and may project
up to 10 inches in front.