


j) Reverse above procedure to re-install.
9. Fast Response Temperature Sensor Module
Replacement
a) Shut-off electrical power to the boiler.
b) Remove control cover screws and open
control compartment.
c) Disconnect wiring connections to the board.
d) Carefully pull out the control board from the
nylon pin supports.
e) Reverse above procedure to re-install.
10. Fast Response Temperature Sensor Probe
Replacement
a) Shut off electrical power to the boiler.
b) Shut off water supply to the boiler and open
drain valve to remove water to the sensor
probe level.
c) Remove control cover screws and open
control compartment.
d) Disconnect wire leads from control board.
e) Remove upper access panel.
f) Remove sensor probe from in/out header.
g) Reverse above procedure to re-install.
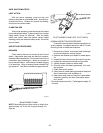
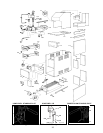
11. Circulator Replacement
a) Shut off electrical power to the boiler.
b) Shut off water supply and open drain valve
to remove water in the piping at the pump
level.
CAUTION: To avoid damage to electrical components
keep water from getting into the control compartments
and gas valve.
c) Disconnect wiring and conduit connections to
the pump.
d) Disconnect the by-pass tube connections to
the inlet flange.
e) Remove the nuts and bolts at the inlet and
outlet flanges. Remove old gaskets.
f) Remove the pump.
g) Reverse the above procedure to re-install.
Use new gaskets and make sure they are
seated properly when tightening the nuts
and bolts.
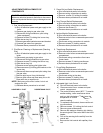
12. 2-Staged Controller (Models 90, 135 & 180)
a) Shut off electrical power to the boiler.
b) Remove control cover screws and open con-
trol compartment.
c) The control is factory set at 160°F. To reset
to another setting, use a small screw driver
and turn dial clockwise to lower the
temperature or counter-clockwise to
raise the setting.
d) To replace the staged controller, disconnect
the wiring connections.
e) Remove screws (2) holding the staged
controller.
f) Remove upper access panel.
g) Remove the wedge or retaining clip holding
the sensing bulb in the control well in the in/
out header.
h) Pull out the sensing bulb carefully from the
control well.
i) Remove the staged control with capillary
from unit.
j) Reverse above procedure to re-install.
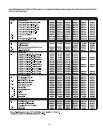
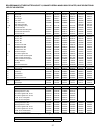
6. REPLACEMENT PARTS LIST
NOTE: To supply the correct part it is important that you
state the model number, serial number and type of gas
when applicable.
Any part returned for replacement under standard
company warranties must be properly tagged with
RAYPAK return parts tag, completely filled in with the
heater serial number, model number etc., and
shipped to the Company freight prepaid.
If determined defective by the Company and within
warranty, the part will be returned in kind or equal
substitution, freight collect. Credit will not be issued.
RAYPAK, INC.
31111 Agoura Road
Westlake Village, CA 91361-4699
34