


Need Help? Call 1-800-598-2527
15
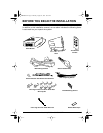
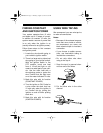
3. Connect the module’s orange
wire to the bullet connector on the
harness’s orange wire.
4. Use a wire tie to secure the mod-
ule to a nonmoving part under the
dash.
CONNECTING TO
POWER DOOR LOCKS
If you have Type C door locks, call 1-
800-598-2527 for additional informa-
tion.
Follow these steps to connect to Type
A or Type B, two-wire door locks.
1. Use a red wire tap-in to connect
the main wiring harness’s brown
wire with black stripe to the wire
you marked either UNLOCK A or
LOCK B.
2. Use a red wire tap-in to connect
the main wiring harness’s green
wire with black stripe to the wire
you marked either LOCK A or
UNLOCK B.
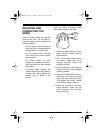
CONNECTING TO THE
PARKING LIGHTS
This connection makes your vehicle’s
parking lights flash during an alert,
when you arm and disarm the vehi-
cle, and when you use the car locater.
Use a red wire tap-in to connect the
main wiring harness’s brown wire to
the wire you marked LIGHTS.
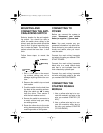
CONNECTING TO THE
DOOR SWITCH
This connection lets the alarm know
when a door is opened or closed.
If you marked the door switch wire
DOOR – SWITCHED, use a red wire
tap-in to connect the main wiring har-
ness’s black wire with yellow stripe to
the door switch wire.
If you marked the door switch wire
DOOR + SWITCHED, use a red wire
tap-in to connect the main wiring har-
ness’s black wire with blue stripe to
the door switch wire.
CONNECTING
ADDITIONAL SENSORS
Follow the instructions that come with
the sensor to mount and power it. The
system requires a connection to
ground on the accessory sensor input
for activation.
If the sensor has a single alarm out-
put, use a red wire tap-in to connect it
to either the main wiring harness’s
yellow wire (to have the sensor trig-
ger the alarm to sound an alert) or to
the harness’s green wire (to have the
sensor trigger only warning chirps).
49-840in.fm Page 15 Thursday, August 19, 1999 10:47 AM