


14
Need Help? Call 1-800-598-2527
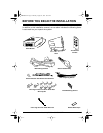
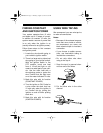
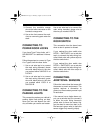
MOUNTING AND
CONNECTING THE ANTI-
CARJACKING SWITCH
Select a location for the anti-carjack-
ing switch. You should be able to
reach the switch when sitting in the
driver’s seat, but the switch should be
hard to find. A typical mounting loca-
tion is under the dash. The mounting
surface should be less than
1
/
8
-inch
thick.
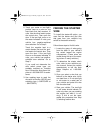
Follow these steps to mount the
switch.
1. Drill a
1
/
4
-inch hole in the mount-
ing surface, taking care not to
damage anything behind the sur-
face.
2. Remove the switch’s top nut and
lock washer.
3. Push the switch into the hole from
the back of the mounting surface.
Align the switch so
ON
is away
from the driver. Then secure it
with the lock washer and nut.
4. Secure the switch’s connector to
a metal vehicle body part using
an existing screw.
5. Route the other wire to the main
wiring harness and plug it into the
matching socket on the system.
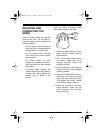
CONNECTING TO
POWER
Before you connect the system to
power,
disconnect your vehicle
battery’s negative (–) power lead.
Note:
You must re-enter any pro-
grammed information into other elec-
tronic devices in your vehicle, such as
clocks and radios, after you recon-
nect the cable.
Connect the main wiring harness’s
red wire to the wire you marked CON-
STANT POWER.
Connect the main wiring harness’s
black wire to a metal vehicle body
part that is not insulated from the
main chassis by a plastic part.
Connect the main wiring harness’s
red wire with black stripe to the wire
you marked IGNITION POWER.
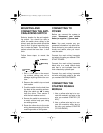
CONNECTING THE
STARTER DISABLE
MODULE
1. Use a yellow wire tap-in to con-
nect the module’s red wire to the
wire you marked STARTER (TO
KEY).
2. Use a yellow wire tap-in to con-
nect the module’s white wire to
the wire you marked STARTER
(TO SOLENOID).
To Harness
To Metal Body
Part
Lockwasher
Nut
49-840in.fm Page 14 Thursday, August 19, 1999 10:47 AM