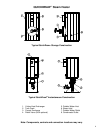
QUICKDRAW
®
Steam Heater
3
WARNING: Use industry standard safe rigging methods when attempting to lift or move
this product. Failure to follow these instructions could result in property damage, serious
injury or death. One common method includes the use of straps and spreader bars, lifting
from the water heater base skid assembly.
1. Check the data decal on the heater. Be sure the electrical supply is adequate for the installation.
2. Carefully remove all shipping supports and bracing.
3. Do not attempt to move or lift heater by the plumbing connections or heat exchanger. Lift only by the
skid using industry standard safe rigging methods.
4. Provide sufficient clearance in front of heat exchanger to facilitate maintenance and removal. See
“Service Clearances” below.
5. Install shut-off valves and unions on the inlet and outlet water piping for servicing. Use caution when
threading pipe nipples into tank connections to prevent cross threading, or over-tightening. Always use a
back-up wrench on tank nipples when tightening unions, valves, etc.
6. Insulate hot water and return circulation lines. Insulate cold water supply lines if subject to freezing
during shutdown periods. IMPORTANT: Do not use the plumbing connected to the appliance as a
ground for welding or any other purpose.
7. The water heater is equipped with a temperature and pressure relief valve(s) rated for the input. Pipe the
relief valve discharge to a suitable open drain. The drain pipe may not be smaller than the relief valve
opening and must be secured to prevent it from lifting out of the drain under discharge pressure. Do not
install valves or restrictions in the discharge line.
8. Pipe the drain valve to a suitable open drain.
WARNING: All system piping to the heat exchanger plumbing must be adequately
supported. Failure to do so will result in excessive loads on the heat exchanger
connections causing damage and/or leakage and potential injury to adjacent personnel.
SERVICE CLEARANCES
Allow sufficient space to provide adequate clearances on all sides for service and inspection.
Recommended clearance is 24” at the top and front, 18” at left and right sides of the appliance. Optional
equipment may increase the clearance requirements. Allow sufficient space for installing and servicing
connections such as water, electrical, pump and other auxiliary equipment.


