


13
English
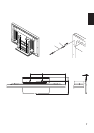
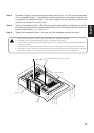
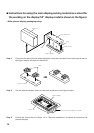
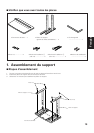
Step 2. As shown in figure, hook the stand pipe holes (either pipe A or B) onto the screw heads
of the installation bolts 1, then slide the stand upwards to the main plasma display until
it engages the installation bolts 1 (once put together with the display, the stand will
slides no more than 19 mm (3/4 inch)).
Step 3. Pass the installation bolts 2 (M8 x 40) through the stand pipes and tighten the installa-
tion bolts securely with the included hexagonal wrench (The holes shpuld be used in the
proper combinations, A–A' and B–B').
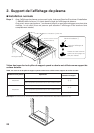
Step 4. Tighten the installation bolts 1 securely with the hexagonal wrench provided.
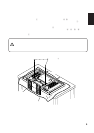
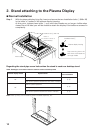
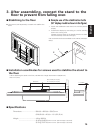
1. Place a sheet or protective cover to protect the display from scratches or damage.
2. Assemble only with the plasma display lying flat on a table or similar surface.
3. Insert the bolts vertically in the holes and tighten them, but do not apply excessive pressure that tightens them
more than necessary.
4. Move the stand so that the stand screw holes and the nuts that connect the main display line up correctly.
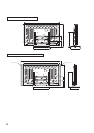
5. The display is a 50” model that weighs approximately 40 kilograms (88 lb) and has little depth, making the
display very unstable. For this reason, at least two people are required for setup and installation.
Notes
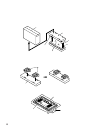
Installation bolts 2 (M8 x 40) (Step 3)
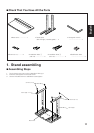
Table top stand
Sheet
Slide the stand (Step 2)