


13
En
English
7
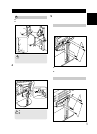
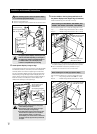
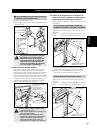
Attach the glass panel to the glass stays.
1 Place the glass panel on top of the glass stays.
Note
The glass panel should be installed with the warning label
facing upwards.
Glass panel
Caution
label
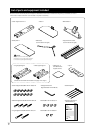
Installation and assembly instructions
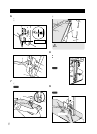
6
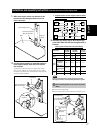
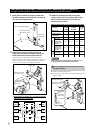
Attach left and right glass stays to support column.
1 Insert the glass stays into the holes provided, pushing
them all the way into the holes so that they point slightly
downwards.
2 Press down on the tips of the glass stays to lower them
and fit the indentations into frames.
Glass stays may be inserted into the upper, middle, or lower
holes to adjust the height of the glass panel (The middle holes
are designed to be used for standard installation).
Glass stay (left)
Glass stay
(right)
Upper
holes
2
2
1
1
2
1
Glass stay
Side with the
rubber guard is
the upper side.
Indentation
Lower
holes
Middle
holes
2 Fix it with the screws (M4 x 10 mm: black) (2 locations: left
and right).
Be sure to use the screws to fix the glass panel into
place. Note that failing to do so could cause the
glass panel to fall off if you come into contact with
it and result in the panel breaking.
Philips screwdriver
Base
Caution
Support
column
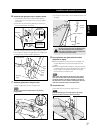
8
Place equipment onto glass panel and connect
equipment to display.
Place the equipment to be connected to the display onto
the glass panel and then connect the equipment to the
display.
Note that the glass panel and base are designed to be able
to withstand loads of up to only 20 kilograms (44.1 lbs), and
that the weight of the equipment placed onto the glass
panel should never exceed this limit.
Note
When a video deck is placed on the glass panel, there may be
times when the video deck interferes with the plasma display
and causes distortion in the picture depending on the place of
the video deck or on other conditions. If this happens, place the
video deck on the base instead to avoid interference.
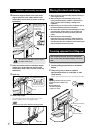
9
Attach cable cover.
Fit the cable cover into the center support column.
Note
Be careful when doing so not to allow cables to get caught
between the cable cover and the cable insertion slots.
Cable cover
Frame
Frame