


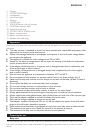
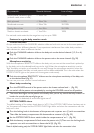
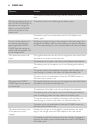


Dry materials Material thickness Loss of range
Wood, plaster, cardboard, glass
(without metal, wires or lead)
< 30cm/12in 0-10%
Brick, plywood < 30cm/12in 5-35%
Reinforced concrete < 30cm/12in 30-100%
Metal grilles or bars < 1cm /0.4in 90-100%
Metal or aluminium sheets < 1cm/0.4in 100%
For wet and moist materials, the range loss may be up to 100%.
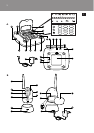
Features in regular baby monitor mode
Channel selection
Always make sure that the CHANNEL selection slides on both units are set to the same position.
You can select four different channels. If you experience interference from other baby monitors,
radio devices etc., select a different channel.
1 Push the CHANNEL selection slide on the baby unit to the desired channel (1, 2, 3 or 4).
(Fig. 19)
2 Push the CHANNEL selection slide on the parent unit to the same channel. (Fig. 20)
Microphone sensitivity
With the microphone SENSITIVITY slide on the baby unit you can set the sound that is picked up
by the baby unit to the desired level: low, mid or high. When the microphone sensitivity is set to
‘high’, the baby unit picks up all sounds. You can only change the microphone sensitivity when the
connection between the baby unit and parent unit has been established. This is the case when the
SYSTEM CHECK light on the parent unit burns green continuously.
1 Push the microphone SENSITIVITY slide to set the microphone sensitivity of the baby unit
to the desired level. (Fig. 21)
You can use your own voice as a sound reference.
Silent baby monitoring
1 Turn the VOLUME control of the parent unit to the lowest volume level £. (Fig. 22)
Do not switch off the parent unit completely by turning the VOLUME control to off position.
The sound level lights on the parent unit visually alert you to any sound the baby makes.The
louder the sounds, the more lights go on.
When no sound is detected, all sound level lights are off.
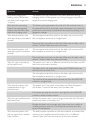
SYSTEM CHECK alarm
The default setting of the system check alarm is ‘off’?. If the SYSTEM CHECK alarm has been set to
‘on’, the parent unit beeps and the SYSTEM CHECK light blinks red when the connection with the
baby unit is lost.
1 Turn the locking knob in the bottom of the parent unit a quarter turn (1) with a screwdriver.
Then slide the battery compartment lid downwards to remove it (2). (Fig. 23)
2 Set the SYSTEM CHECK alarm switch inside the compartment to ‘on’>. (Fig. 24)
3 Slide the battery compartment lid back onto the parent unit (1). Then turn the locking knob
a quarter turn with a screwdriver to fasten the lid (2). (Fig. 25)
Note:In default setting, only the SYSTEM CHECK light blinks red when the connection is lost.
,
ENGLISH 11