


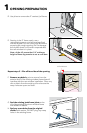
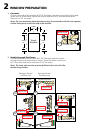
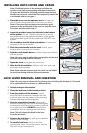
A. Place a corner bead of sealant on the edge
of the window flush flange on top, sides and
bottomtothestucco.Leavea2"gapinthe
sealant bead at the bottom, corresponding
to the weep hole locations in the existing
aluminum window frame.
Exterior
2"
4A
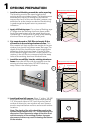
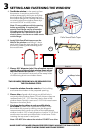
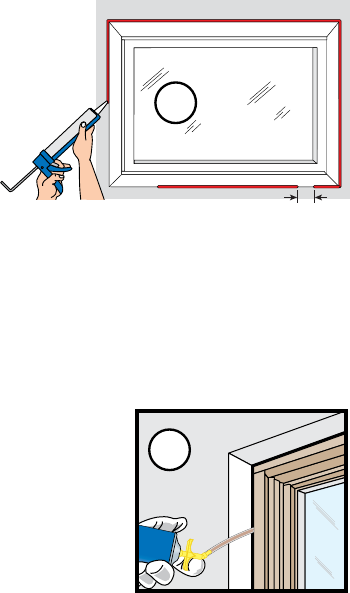
CAUTION: Ensure use of low pressure polyurethane window and door insulating foams
and strictly follow the foam manufacturer’s recommendations for application. Use of
high pressure foams or improper application of the foam may cause the window frame
to bow and hinder operation.
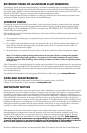
A. Apply insulating foam sealant. From the interior,
insertthenozzleoftheapplicatorapproximately1"
deep into the space between the window frame (not
jambextension)androughopeningandapplya1"
deep bead of foam. This will allow room for expansion
ofthefoamandwillminimizesqueeze-out.Apply
sealant across the interior surface of shims to create a
continuous seal. Follow manufacturer’s instructions.
Note: It may be necessary to squeeze the end of the tube with pliers to be able to insert
into the space between the window frame and the rough opening. DO NOT completely
fill the space from the back of the flange to the interior face of the window
5A
B. Check the window operation (vent units only) by opening and closing the window.
Note: If the window does not operate correctly, check to make sure it is still plumb, level,
square, and the jambs are not bowed. If adjustments are required, remove the foam with a
serrated knife. Adjust the shims and reapply the insulating foam sealant.
Interior Finish or Trim:
The space between the new window and the existing window’s frame will need to be covered
withtrim.Therearemanywaystoaccomplishthisandeachcasecanbeunique.Howthisis
done will be the decision of the homeowner or window installer. A few possibilities include
using cove, quarter round, or a stop moulding.
4
APPLY EXTERIOR PERIMETER SEALANT
5
INTERIOR SEAL
5A