


Becauseallconstructionmustanticipatesomewaterinltration,itisimportantthatthewallsystem
be designed and constructed to properly manage moisture. Pella Corporation is not responsible
forclaimsordamagescausedbyanticipatedandunanticipatedwaterinltration;decienciesin
buildingdesign,constructionandmaintenance;failuretoinstallPella
®
products in accordance
withPellainstallationinstructions;ortheuseofPellaproductsinwallsystemswhichdonotallow
for proper management of moisture within the wall systems. The determination of the suitability of
all building components, including the use of Pella products, as well as the design and installation
of flashing and sealing systems are the responsibility of the Buyer or User, the architect,
contractor, installer, or other construction professional and are not the responsibility of Pella.
Pella products should not be used in barrier wall systems which do not allow for proper
managementofmoisturewithinthewallsystems,suchasbarrierExteriorInsulationandFinish
Systems,(EIFS)(alsoknownassyntheticstucco)orothernon-watermanagedsystems.Except
inthestatesofCalifornia,NewMexico,Arizona,Nevada,Utah,andColorado,Pella makes no
warranty of any kind and assumes no responsibility for Pella windows and doors installed
in barrier wall systems. In the states listed above, the installation of Pella products in barrier
wall or similar systems must be in accordance with Pella installation instructions.
ProductmodicationsthatarenotapprovedbyPellaCorporationwillvoidtheLimitedWarranty.
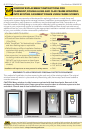
IMPORTANT NOTICE
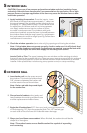
INSTALLING ROTO COVER AND CRANK
Note: Finish the interior of the window and allow the window to dry before proceeding with
these instructions. (To open the window for finishing, partially insert the lock handle into the
jamb, unlock the unit, temporarily attach the crank handle and turn to open.)
A. Place the cover over the
operator stud and snap
into place. Position the
pocketendofthecover
into place.
Note: If the cover does
not have the screw hole,
apply pressure on the
pocket end of the cover
to snap the cover into
place and proceed to
step C.
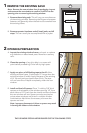
B. Insert the provided
screw into the hole
in the bottom of the
pocket. Usea#1Phillips
screwdriver to secure
thepocketscrewsnug
against the bottom of
thepockettoavoid
scratchingthecrankhandleknob.DO NOT over tighten.
C. Use a medium size flat-blade screwdriver to loosen the set screw in the crank handle.
D. Slide the crank handle onto the stud.Unlock,openwindow,thencloseandlockwindow.
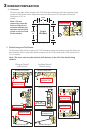
E. Fold the crank handle down andcheckalignmentofknobwiththepocket.
Note: You may need to adjust the crank position on the stud until the correct alignment is
achieved.
F. Open the crank and tighten the set screw.
G. After the final installation, fold the crank over and snap the knob into the pocket.
Note: Even with the window open the crank can be folded to avoid interferring with the
window treatments.
Pocket End
Operator Stud
Screw Hole
A
B
Crank Handle
Operator Stud
Set Screw
C
D
Knob
Pocket
E