


4
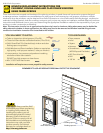
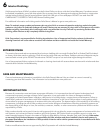
Sealing the Window to the Exterior Wall Cladding:
:KHQDSSO\LQJVLGLQJEULFNYHQHHURURWKHUH[WHULRUŵQLVKPDWHULDOOHDYHDGHTXDWHVSDFHEHWZHHQWKHZLQGRZIUDPHDQG
the material for sealant. Refer to the illustration corresponding to your finish material.
Note: The sealant details shown are standard recommendations from the sealant industry. Contact your sealant supplier
for recommendations and instructions for these and any other applications.
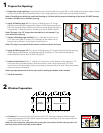
WOOD
SIDING
1/8" Clearance
Sealant typical
Insulate
and
seal per
Step 5
Accessory
Groove
1/8"
BRICK VENEER
3/8" Clearance
Backer Rod and
Sealant typical
Perimeter Sealant
must extend to room
side of Accessory
Groove.
Accessory Groove
Insulate
and
seal per
Step 5
1/2"
Min.
3/8"
WOOD SIDING
WITH TRIM
3/8" Clearance
Insulate
and
seal per
Step 5
Perimeter Sealant
must extend to room
side of Accessory
Groove.
Accessory Groove
Sealant typical
1/2"
Min.
3/8"
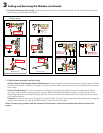
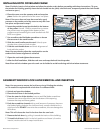
A. Insert backer rod into the space around the window as deep as it will go.
7KLVVKRXOGSURYLGHDWOHDVWDFOHDUDQFHEHWZHHQWKHEDFNHUURGDQGWKH
H[WHULRUIDFHRIWKHZLQGRZ
Note: Backer rod adds shape and depth for the sealant line.
B. Apply a bead of high quality exterior grade sealant to the entire perimeter
of the window.
C. Shape, tool and clean excess sealant. When finished, the sealant should be
the shape of an hourglass.
Note: This method creates a more flexible sealant line capable of expanding
and contracting.
$
%
5
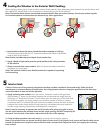
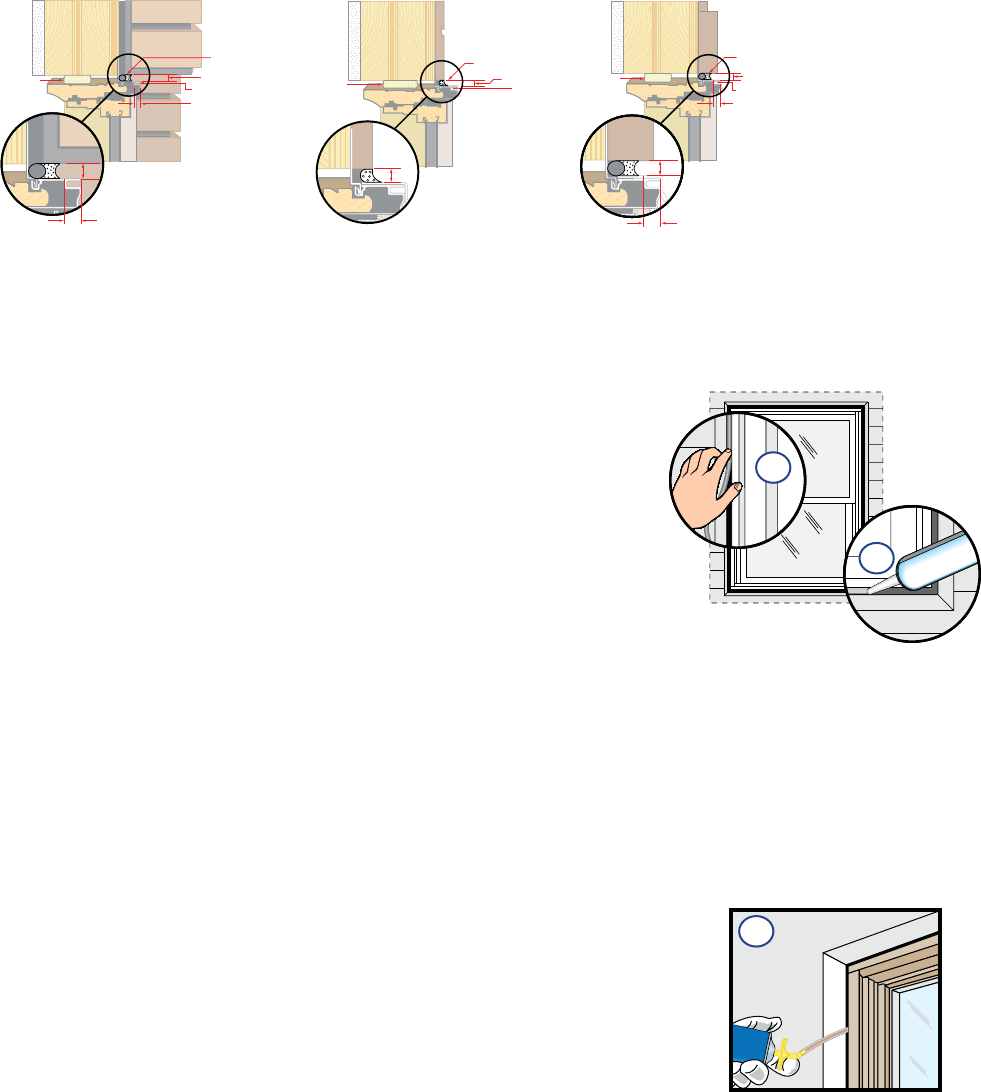
Interior Seal:
Caution: Ensure use of low pressure polyurethane window and door installation foams and strictly follow the foam
manufacturer’s recommendations for application. Use of high pressure foams or improper application of the foam may
cause the window to bow and hinder operation.
A. Apply insulating foam sealant. From the interior, insert the nozzle of the applicator
DSSUR[LPDWHO\GHHSLQWRWKHVSDFHEHWZHHQWKHZLQGRZDQGWKHURXJKRSHQLQJ
DQGDSSO\DGHHSEHDGRIIRDP7KLVZLOODOORZURRPIRUH[SDQVLRQRIWKHIRDPDQG
will minimize squeeze out. Apply sealant across interior surface of shims to create a
FRQWLQXRXVVHDO)RUZLQGRZVZLWKMDPEH[WHQVLRQVLQVWDOOHGHQVXUHWKHIRDPLVSODFHG
EHWZHHQWKHZLQGRZIUDPHDQGWKHURXJKRSHQLQJQRWEHWZHHQWKHMDPEH[WHQVLRQ
and the rough opening. Follow foam manufacturer's instructions.
Note: It may be necessary to squeeze the end of the tube with pliers to be able to insert
into the space between the window frame and the rough opening. DO NOT completely fill
the space from the back of the backer rod to the interior face of the opening.
5A
B. Check window operation (vent units only) by opening and closing the window.
Note: If the window does not operate correctly, check to make sure it is still plumb, level, square and that the sides are not
bowed. If adjustments are required, remove the foam with a serrated knife. Adjust the shims, and reapply the insulating
foam sealant.