Exterior
1D
'
&
(
)
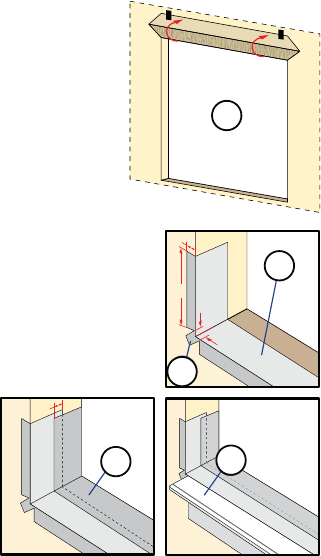
D. Fold the water resistive barrier. Fold side flaps into the
opening and staple to the inside wall. Fold the top flap up
and temporarily fasten with flashing tape.
E. Apply sill flashing tape #1. Cut a piece of flashing tape 12"
longer than the opening width. Apply at the bottom of the
opening as shown so it overhangs 1" to the exterior.
Note: The tape is cut 12" longer than the width of the
opening so it will extend up each side approximately 6".
F. Tab the sill flashing tape and fold. Cut 1" wide tabs at each
corner (1/2" from each side of corner). Fold tape to the exterior
and press firmly to adhere it to the water resistive barrier.
G. Apply sill flashing tape #2. Cut a piece of flashing tape
12" longer than the opening width. Apply at the bottom,
overlapping tape #1 by at least 1". DO NOT allow the tape to
extend past the interior face of the frame.
Note: The flashing tape does not need to
extend all the way to the interior of the
framing.
H. Attach the aluminum sill support or
wood blocking to the exterior of the sill
structure to support the edge of the door
sill. The sill support should be cut the entire
length of the sill member and placed flush
with the subfloor.
A. Remove the plastic wrap and cardboard packaging from the door.
Note: If screens or hardware are removed from the door at this time, label them
and store them in a protected area.
B. OX/XO doors only: Remove the shipping spacers. Carefully slide the movable
panel halfway open and remove the spacers from both the top and bottom of the
movable panel.
TWO OR MORE PEOPLE WILL BE REQUIRED
TO HANDLE THE PANEL AND FRAME SAFELY.
C. OX/XO doors only: If the vent panel is installed in the frame, you will need to
remove the vent panel by lifting it out of the lower track and tilting the bottom of
the panel away from the door frame. Then lower the panel out of the top track.
Carefully set the panel aside.
Note: If transoms or fixed units are mulled to doors and/or fins are to be
installed to no fin units, go to the Mulling Instructions and/or Applying
Installation Fins Instructions on the back before proceeding to the next step.
1D
1E
1E
1H
1G
1
ROUGH OPENING PREPARATION (CONTINUED)
2
PREPARE THE DOOR FOR INSTALLATION


