


8 C486M-C (9/06)
CAMERA AND LENS INSTALLATION
Once the enclosure has been secured to the mounting surface you can install the camera and lens. Follow the steps outlined below.
NOTE:
The tilt table bracket and tilt table may be removed from the enclosure to aid in camera and lens installation.
1. Loosen the tilt table mounting bolts.
2. Securely attach the camera and lens to the desired location on the tilt table.
3. Make all necessary electrical connections (video, camera power, etc.)
4. Position the tilt table at the desired location and angle, and then tighten the 1/4-20 fasteners to secure the tilt table in place.
5. Close the lid to ensure that there is no interference.
6. Provide power to the camera and check for adequate video image.
7. Secure the cover with the 1/4-20 tamper-resistant screws provided.
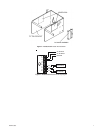
TAMPER SWITCH WIRING
The HS2500 is equipped with a tamper switch mounted on the access door. This switch can be used as an alarm closure to trigger an audible
alarm and/or visual display on a monitor, indicating unauthorized intrusion of the enclosure.
The tamper switch comes with wiring connections consisting of 1/4" (0.63 cm) quick-connect terminals. It has normally open and normally closed
contacts as indicated on the switch body. In addition, a “pull-to-cheat” feature allows the technician to disable the audible alarm (in the case of
the HS2500/SPKR model) while having the door open for maintenance.
MAINTENANCE
Maintenance performed at regularly scheduled intervals will help prolong the operational life and appearance of the equipment.
Clean the window with a mild, nonabrasive detergent in water and a soft cloth regularly to help maintain picture clarity. For a heavily soiled
window, use vinyl cleaner.