


Hardware to attach the heater bracket(s)
EH3508/EH3512 Series EH3515/EH3515L Series
4 3/8-inch screws 4 3/8-inch screws
4 #6 nylon washers 4 #6 nylon washers
2 1/4-inch Phillips pan head screws
2 #6 lock washers
Hardware to attach the PC board (EH3508/EH3512/EH3515 only)
2 6-32 x 3/8-inch Phillips pan head screws
4 #6 nylon washers
1 #6 lock washer
1. Disconnect all sources of power from the enclosure.
2. Unlatch and open the lid.
3. Remove the camera and camera sled.
a. Disconnect the power and video from the camera.
b. Loosen the screws that hold the camera sled in place.
c. Slide the sled forward so it can be lifted out over the screws. Do not lift the sled
out yet.
d. Retighten the screws so the sliding bar under the sled lip will not move. This will assure
that you reinstall the camera and sled in the same place.
e. Remove the camera and sled.
4. If there is a heater pad installed in the bottom of the enclosure or a defroster pad installed
around the viewing window, disconnect and remove these pads.
5. Remove the bottom window bracket, and then remove the top window bracket. Important…
Do not try to reinstall the top and bottom window brackets.
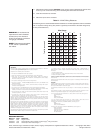
6. Attach the heater bracket (with heater and defroster attached) to the inside face of the window
using the screws provided (refer to Figure 1).
7. If you are installing the HD3515 Heater and Defroster Kit, perform the following steps:
a. If a blower was previously installed in the enclosure, remove the blower now.
b. Place the rear heater bracket (with attached heater) at the rear of the enclosure (refer
to Figure 1). Be sure the heater is at the bottom of the enclosure and faces the rear of
the enclosure.
c. Do one of the following:
If a blower was previously installed, place the blower against the rear heater bracket
and attach to the enclosure using the screws previously removed from the blower. Be
sure the arrow on the blower housing is pointing toward the viewing window.
Or…
Using the screws provided, attach the rear heater bracket to the rear of the enclosure.
8. Do the following only for enclosures in the EH3512 Series and EH3515 Series:
a. Place the PC board at the rear of the enclosure in front of the blower (if installed) and
heater bracket. Lay the PC board across the bottom of the enclosure with the thermostat
and connectors facing up. Note…If a blower is not installed, place the PC board
approximately 1 1/2 inches in front of the rear heater bracket.
b. Using the two 6-32 x 3/8-inch self tapping screws, two star washers, and four nylon
washers provided, attach the PC board to the slots running along the bottom of the
enclosure (refer to Figure 1).
9. Route the heater and defroster wires from the front of the enclosure so they will be underneath
the camera sled or between the track rail and body of the enclosure.