C1005M-G (10/02) 5
INSTALLATION FOR DX2000 DVR AND DX2000DH DATA HUB
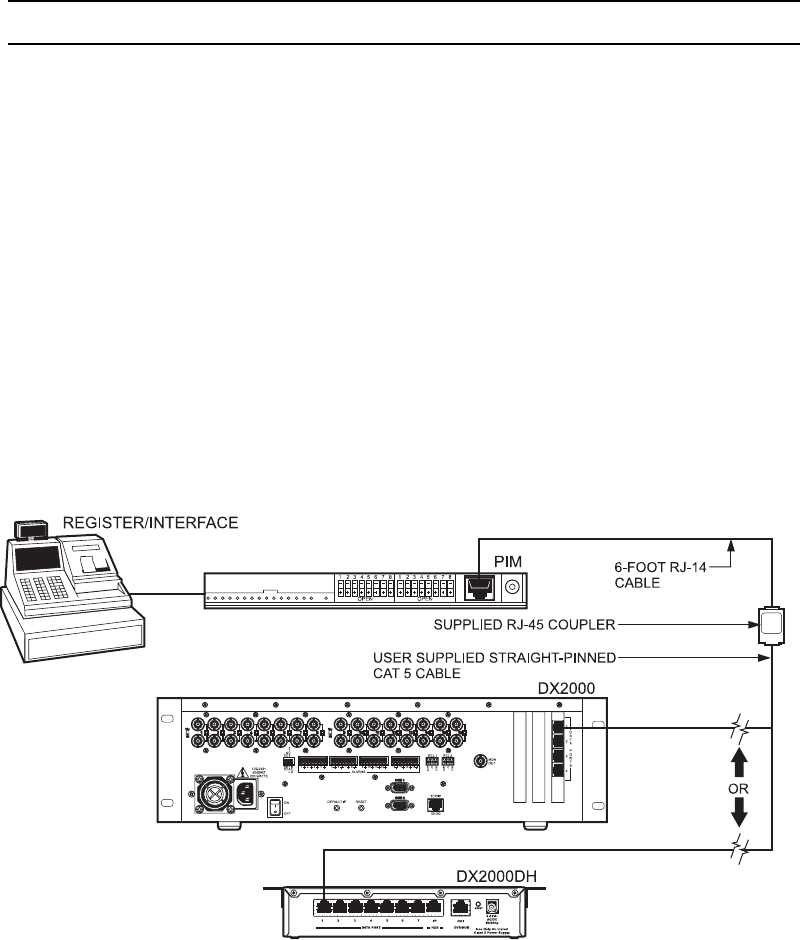
Refer to Figure 3 and the DX2000 Digital Video Recorder Installation/Operation Manual (C690M) and DX2000DH Data Hub
Manual (C698M) as you install the ICI1000PIM.
1. Configure DIP switch bank 1 (refer to the
Configuring DIP Switch Bank 1
section) for the device to which you are interfacing.
2. Configure DIP switch bank 2 (refer to the
Configuring DIP Switch Bank 2
section) for the device to which you are interfacing.
3. Locate the 16-pin connector on your register/interface. Plug the register/interface connector into the PIM.
4. Plug the provided RJ-14 (six-pin) phone cable into the data connector in the PIM.
NOTE: The provided RJ-14 phone cable is a straight-through cable. The PIM will not work with a flipped cable.
5. Connect the other end of the data cable to the RJ-45 coupler provided.
6. Connect a straight-pinned CAT 5 cable from the coupler to the DX2000 DVR or DX2000DH Data Hub.
7. Mount the PIM near the register/interface. Depending on the application, you may need to use double-sided tape to
secure the ICI1000PIM to the mount location.
8. On the Communication Type Setup tab of the DX2000’s Data Interface configuration screen, select Pelco PIM as the
communication type in the Device Type pull-down menu. Refer to the DX2000 Installation/Operation manual (C690M) for
more information.
9. Power up the register/interface.
10. Connect the power plug to the PIM and plug the wall mount transformer into power. This powers up the PIM.
11. Upon PIM power-up, a message that matches your PIM switch settings for your register/interface type will appear in the
Live Data screen for the selected data device. A PIM version number is also displayed. This message indicates the
DX2000 and PIM are communicating properly.
Figure 3. Connecting the Components for DX2000
