


MC-V414 00
10
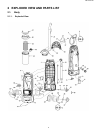
3 REPLACEMENT INSTRUCTIONS
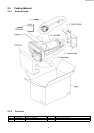
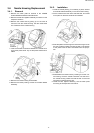
3.1. Lower Plate
3.1.1. Removal
1. Place handle in low position.
2. Turn the vacuum cleaner over exposing the underside.
Release the lower plate by pressing the two (2) latches
that secure it inward.
3. Separate the lower plate from the vacuum.
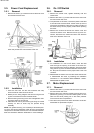
3.1.2. Installation
1. Close the rear belt cover.
2.
3. Hook the front of the lower plate into the slots on the front
of the nozzle housing. Press the lower plate down into
place.
4. Fasten the lower plate by pushing the two (2) latches out-
ward.
5. NOTE: For general servicing, it is necessary to eliminate
pinching of any wire during reassembly. After servicing
any electrical component or enclosure, the unit should be
reassembled and checked for dielectric breakdown or
current leakage.
3.2. Belt Replacement
3.2.1. Removal
1. Follow the removal instructions outlined in the AGITATOR
ASSEMBLY REMOVAL/INSTALLATION section.
3.2.2. Installation
1. Place the new belt around the motor shaft and follow the
installation instructions in the AGITATOR ASSEMBLY
REMOVAL/INSTALLTION section.
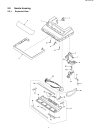
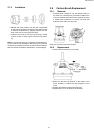
3.3. Agitator Assembly
3.3.1. Removal
1. The brushes are not replaceable separately. When the
brushes need replacing, the agitator assembly will have
to be replaced.
2. Carefully lift up on the agitator assembly until it clear both
sides of the nozzle housing.
3. Remove the belt from the motor shaft by sliding it off
between the end of the shaft and the nozzle housing.
3.3.2. Installation
1. Place the belt around the motor shaft.
2. Place the belt around the agitator pulley on the agitator
assembly.
3. Reassemble the new agitator assembly back into the noz-
zle housing by placing the side opposite the belt partially
into the slot. The small tabs should be aligned with the
nozzle. This will hold the agitator in place and leave both
hands free to place enough tension on the belt to allow
that side of the agitator to return to the nozzle housing slot.
4. Rotate the agitator assembly by hand to insure nothing
rubs and to check for correct assembly.
5. Replace lower plate.