


AIR CONDITIONER INSTALLATION
INSTALACIÓN DEL ACONDICIONADOR DE AIRE
AIR CONDITIONER INSTALLATION
INSTALACIÓN DEL ACONDICIONADOR DE AIRE
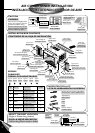
CABINET INSTALLATION
INSTALACIÓN DEL CAJA
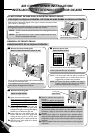
Window sash sealing ribbon
Cinta de sellado de la hoja
móvil
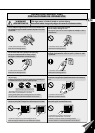
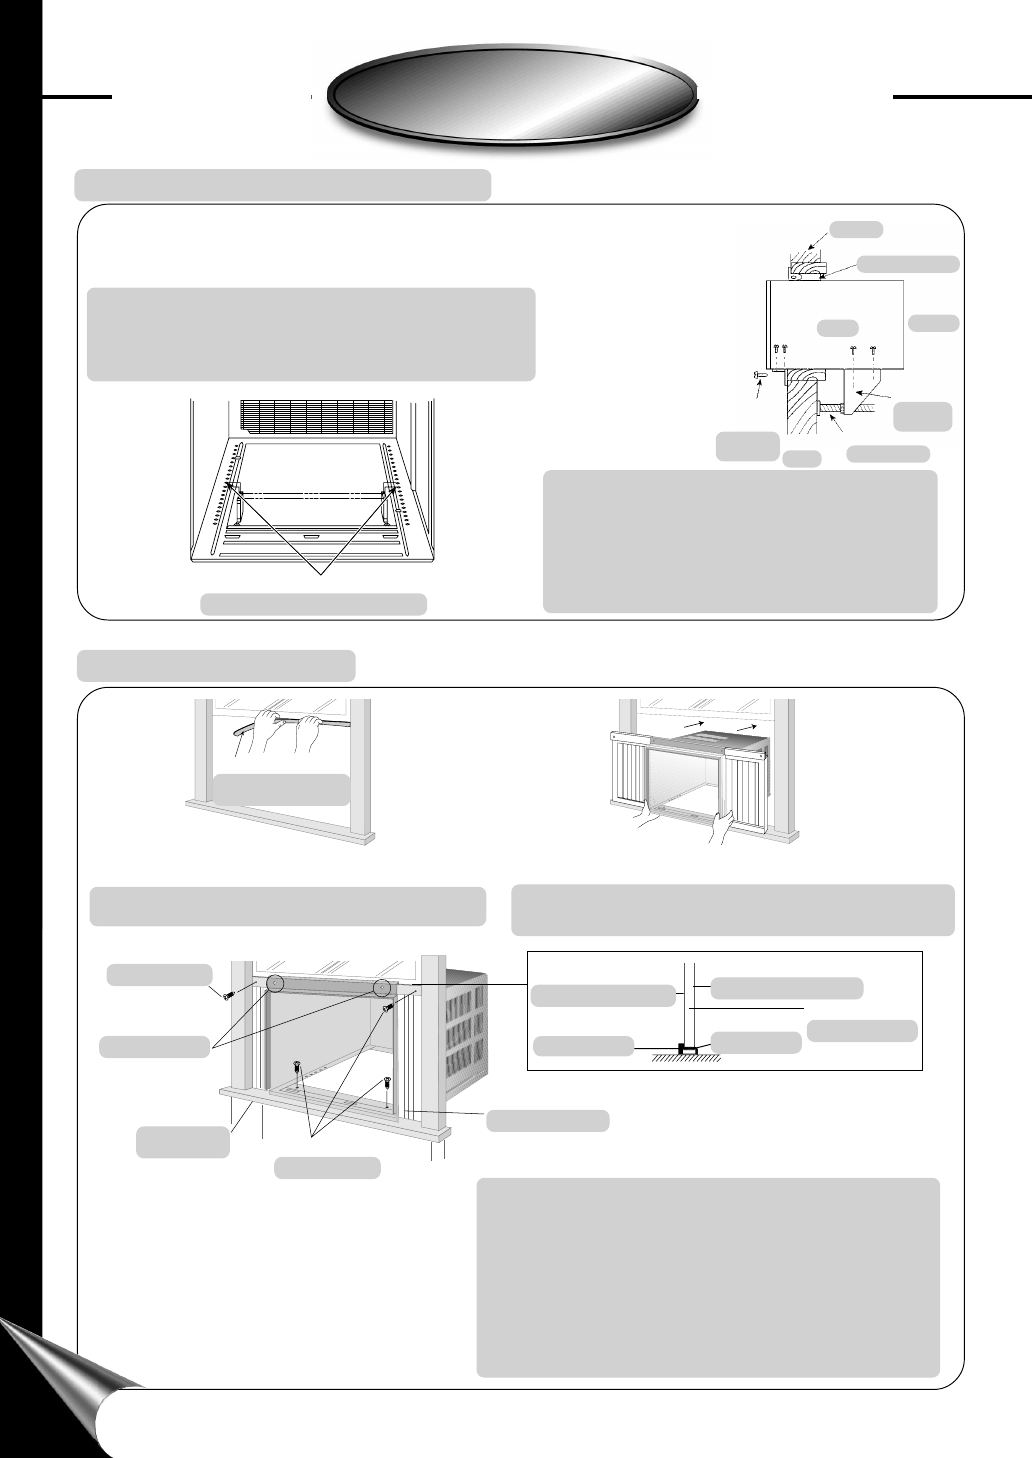
• Cut the “Sealing Ribbon” to the proper length, and attach it
along the bottom edge of the bottom window sash.
• Corte la cinta de sellar del largo apropiado y colóquela a lo
largo de la parte inferior de la ventana de guillotina.
• To prevent condensation water from dripping inside, the cabinet should
be installed level or very slightly tilted to the outside.
• Para prevenir que el agua de condensación gotee dentro, el caja debe
ser instalada al nivel o con una muy ligera inclinación desde adentro
hacia fuera.
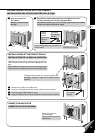
• Expand the extension frame fully into the grooves of the
window frame, secure extension frames left and right and
top mounting frame to the bottom of the window sash
using 2 screws type D and 4 screws type A.
• Secure the cabinet using wood screws type A.
• Cut the window sash foam seal to the proper size and
seal the opening between the top of the inside window
sash and the outside window sash.
Note : If a gap exists between the unit and window sash,
you may use “Sealer” supplied with the installation
kit for a better seal.
Window sill
Alféizar de la
ventana
Type A screw
Tornillos tipo A
Expandable panel
Panel extensible
Type A screw
Tornillos tipo A
Type D screw
Tornillos tipo D
• Expande el marco de extensión completamente dentro del marco de
la ventana, fije los marcos de extensión izquierdo y derecho, y el marco
de montaje superior a la parte inferior de la hoja móvil usando dos
tornillos tipo D y cuatro tornillos tipo A.
• Fije la caja usando tornillos para madera tipo A.
• Corte la cinta para sellar de la hoja de la ventana del tamafío correcto
y selle la abertura entre la parte superior del interior y del exterior
de la hoja de la ventana.
Nota : Si existiera un espacio entre la unidad y la hoja de la ventana,
puede usar el sellador que está dentro del paquete de instalación,
para obtener un mejor sellado.
Inside of sash
Interior de la hoja móvil
Top angle
Angulo superior
Sealing ribbon
Cinta de sellar
Window sash
Hoja de la ventana
Outside of sash
Exterior de la hoja móvil
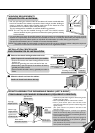
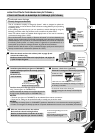
INSTALL SUPPORT BRACKETS
INSTALE LAS ESCUADRAS-SOPORTES
1. Install large adjusting bolts into the support brackets.
2. Select matching pair of holes on bottom flange of cabinet, just past the
outer edge of sill. Attach left and right support brackets to bottom
flange of cabinet with 2 Type F screws, ensuring that locations match.
1. Ponga los pernos ajustadores en las escuadras-soportes.
2. Seleccione 2 hoyos opuestos en el reborde inferior del chasis, situados
justo después del lado exterior de la repisa. Ajuste las escuadras-
soportes izquierda y derecha al reborde inferior del chasis con 2 tornillos
Tipo F, asegúrandose de ponerlos en hoyos exactamente opuestos.
3. Level cabinet by rotating
the adjusting bolt.
Cabinet should be level
or have a 1/8" pitch
toward the outside.
4. Attach a 90° bracket on
each side of the bottom
of the cabinet with Type
F screws to secure the
cabinet position in the
window frame is wood,
fasten the lower part of
the brackets to the frame
with Type A screws.
3. Para nivelar el chasis, déle vuelta al perno ajustador. El chasis
debe estar a nivel, o puede tener una inclinación de 1/8" hacia
afuera.
4. Atornille los soportes angulares 90° de cada lado de la parte
inferior del chasis con tornillos Tipo F, para fijar la posición del
chasis dentro de la ventana. Si el marco de la ventana es de
madera, asegure la parte inferior de los soportes al marco
con tornillos Tipo A.
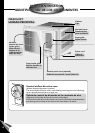
Match holes for bracket support
Hoyos opuestos para escuadra-soporte
Cabinet
Chasis
Window
Ventana
Sealing ribbon
Precinto sellador
Outdoor
Exterior
Wood
screw
Tornillo de
madera
Support
bracket
Escuadra-
soporte
Adjustable bolts
Perno ajustable
Wall
Pared
9