39
14.2 Breakdown Self Diagnosis Function
14.2.1 Self Diagnosis Function (Three Digits Alphanumeric Code)
• Once error occurred during operation, the unit will stop its operation, and Timer LED blinks.
• Although Timer LED goes off when power supply is turned off, if the unit is operated under a breakdown
condition, the LED will ON again.
• In operation after breakdown repair, the Timer LED will not blink. The last error code (abnormality) will be stored
in IC memory.
14.2.2 To Make a Diagnosis
1 Timer LED starts to blink and the unit automatically stops the operation.
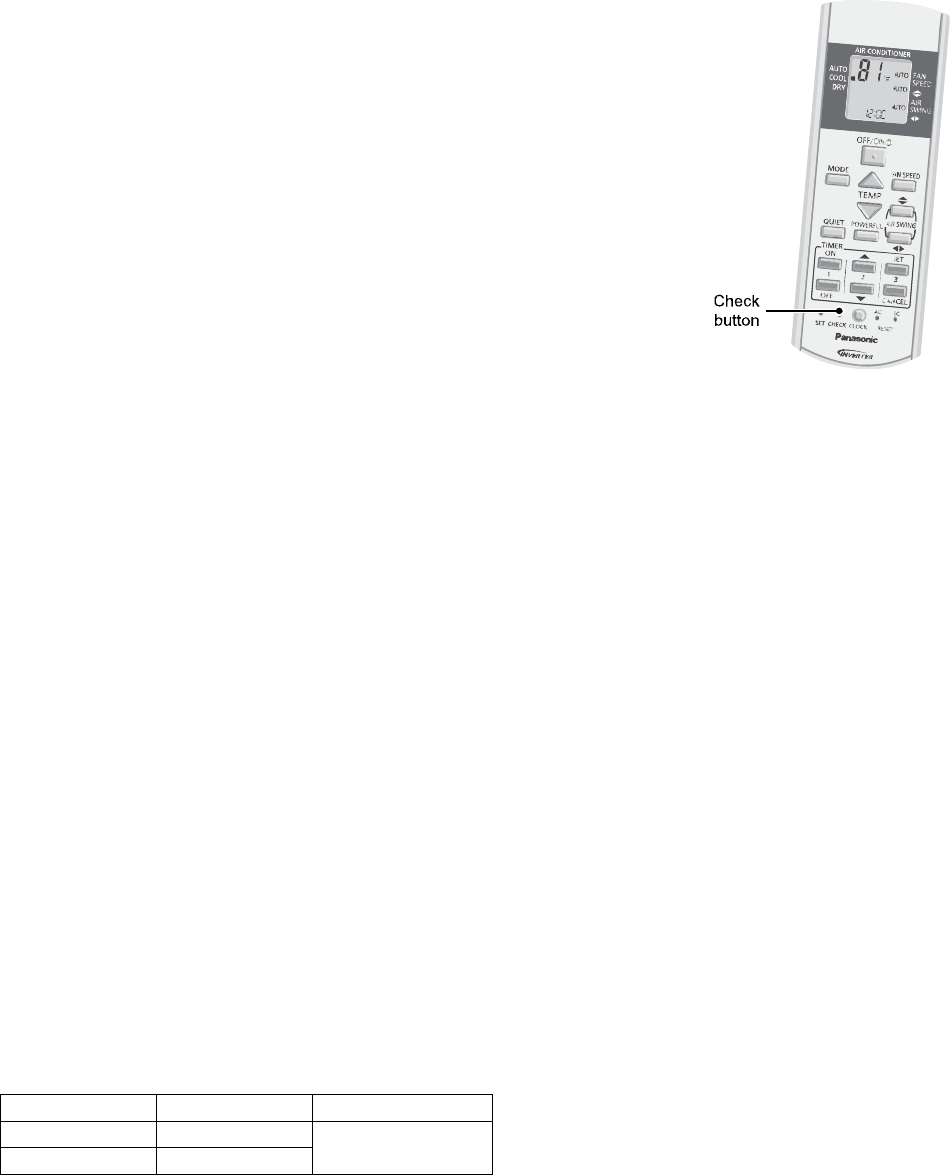
2 Press the CHECK button on the remote control continuously for 5 seconds.
3 “- -“ will be displayed on the remote control display.
Note: Display only for “- -“ (No signal transmission, no receiving sound and no
Power LED blinking)
4 Press the TIMER ▲ or ▼ button on the remote control. The code “H00” (no
abnormality) will be displayed and signal will be transmit to the main unit.
5 Each press of the button (▲ or ▼) will increase error code number and
transmit error code signal to the main unit.
6 When the latest abnormality code on the main unit and code transmitted from
the remote control are matched, Power LED will light up for 30 seconds and a
“beep” sound (continuously for 4 seconds) will be heard. If no codes are
matched, Power LED will light up for 0.5 seconds and no sound will be heard.
7 The breakdown diagnosis mode will be canceled unless pressing the CHECK
button continuously for 5 seconds or operating the unit for 30 seconds.
8 The LED will be off if the unit is turned off or the RESET button on the main
unit is pressed.
14.2.3 To Display Memorized Error Code (Protective Operation)
1 Turn power on.
2 Press the CHECK button on the remote control
3 “- -“ will be displayed on the remote control display.
Note: Display only for “- -“ (No signal transmission, no receiving sound and no Power LED blinking)
4 Press the TIMER ▲ or ▼ button on the remote control. The code “H00” (no abnormality) will be displayed
and signal will be transmit to the main unit.
5 Each press of the button (▲ or ▼) will increase error code number and transmit error code signal to the main
unit.
6 When the latest abnormality code on the main unit and code transmitted from the remote control are matched,
Power LED will light up for 30 seconds and a “beep” sound (continuously for 4 seconds) will be heard. If no
codes are matched, Power LED will light up for 0.5 seconds and no sound will be heard.
7 The breakdown diagnosis mode will be canceled unless pressing the CHECK button continuously for 5
seconds or operating the unit for 30 seconds.
8 The same diagnosis can be repeated by turning power on again.
14.2.4 To Clear Memorized Error Code after Repair (Protective Operation)
1 Turn power on (in standby condition).
2 Press the AUTO button for 5 seconds (a “beep” sound is heard) on the main unit to operate the unit at
Forced Cooling Operation Mode.
3 Press the CHECK button on the remote control for about 1 second with a pointed object to transmit signal to
main unit. A “beep” sound is heard, and the Error Code is cleared.
14.2.5 Temporary Operation (Depending On Breakdown Status)
1 Press the Auto OFF/ON button on the main unit (a “beep” sound is heard) to operate the unit. (Remote
control is enable again).
2 The unit can be temporarily be used until repaired.
Error Code Operation Temporary items
H23 Cooling
H27, H28 Cooling
Emergency Operation
with limited power


