


6
ENGLISH
Maintenance.
WARNING: Unplug cord from electrical outlet before servicing.
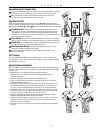
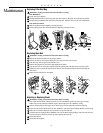
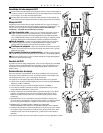
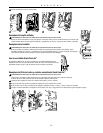
BAG REMOVAL:
Unzip outer bag completely.
Pull bag cardboard collar to release bag dock door from connector. Bag dock door will hinge downward.
Gently pull bag cardboard collar upward out of the bag dock. Saniseal
®
dust seal will close automatically.
BAG INSTALLATION:
Slide the cardboard collar completely onto bag dock door.
Firmly push bag dock door with both thumbs on indication point until it snaps.
Replacing Filter Dust Bag
ENFONCEZ JUSQUENFONCEZ JUSQU’À
ENTENDRE UN BRUITENTENDRE UN BRUIT
PRESIONE HASTA
ESCUCHAR UN ESCUCHAR UN
CHASQUIDO DE SUJECICHASQUIDO DE SUJECIÓN
ENFONCEZ JUSQU’À
ENTENDRE UN BRUIT
PRESIONE HASTA
ESCUCHAR UN
CHASQUIDO DE SUJECIÓN
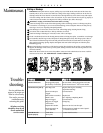
WARNING: Unplug cord from electrical outlet before servicing.
Remove the replacement belt from the storage channel.
Remove the door by removing the hold down screw located on side of power head.
Fold door away from the power head and lift it away.
Remove the belt from the motor drive shaft and brush roll pulley.
Loop the new belt over the brush roll pulley. Place the opposite end of the belt on the motor drive shaft.
Replace the door by placing the bottom tab on door into slots located inside power head and pressing the
door closed.
Replace the hold down screw and tighten.
Replacing Worn Belt
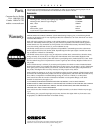
WARNING: Unplug cord from electrical outlet before servicing.
Your Oreck Vacuum comes with the brush roll set at the “NORMAL” position for most types of carpets.
When using vacuum primarily on Berber Carpets, adjust brush roll to the “SPECIAL” setting.
Remove the base plate by removing 5 screws. Then, remove the belt and brush roll from the housing.
Rotate both end cards of the brush roll to show “SPECIAL” and replace in the holding channels of the housing.
Note: The one marked “SPECIAL” has several ribs on top of the end card.
The brush end card setting marked “NORMAL” has one rib. When rotating bearings, make sure both end card
assembly settings are the same and face up when replacing the brush roll.
Reassemble the belt.
Reassemble the baseplate.
Adjusting or Replacing Brush
8
9
10
11
12
8 9 10 11 12
13
14
15
16
17
15
14
13
14
15
16 17
18
19
20
21
17
18