


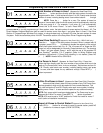
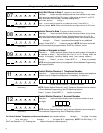
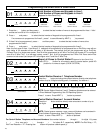
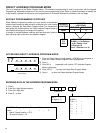


Entry/Exit Zones in Area 1 (Appears for New Panel Only)
Press the A button and then directly enter the zone number of any zones
which are to be used as Entry/Exit zones. Valid entries are from 01 to 32. Di-
rectly enter each zone number, including leading zeros.
Use number buttons 0 through 9.
Press Jto save and then repeat for any additional zone(s). Press NEXT (E)
button to proceed. NOTE: Chime will automatically be programmed for all E/E zones.
Interior Zones in Area 1 (Appears for New Panel Only)
Press the A button and then directly enter the zone number of any zones
which are to be used as Interior Zones. Valid entries are from 01 to 32. Di-
rectly enter each zone number, including leading zeros. Use number buttons
0 through 9. Press Jto save and then repeat for any additional
zone(s). Press NEXT (E) button to proceed. NOTE: All Interior zones will
also be automatically programmed as “Exit/Entry Follower” zones.
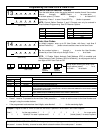
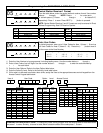
Number of Keypads in Area 1
Press the A button and then directly enter the total number of Keypads to
be installed in Area 1. Valid entries are from 01 to 07. Directly enter the
number of keypads, including leading zeros. Use number buttons 0
through 9. Press Jto save . Press NEXT (E) button to proceed.
NOTE: Area 2 keypads can only be assigned in Direct Address Programming.
See Keypad Options.
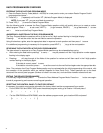
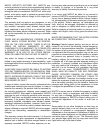
Central Station Receiver 1 Telephone Number
Press the A button and using the number buttons, directly enter telephone
number of up to 16 digits including prefix, if necessary, for receiver 1.
NOTE: Central Station Receiver 2 and 3 Telephone Numbers can be entered
in Direct Address Programming. See CS Reporting Options.
Press Jto save . Press NEXT (E) button to proceed.
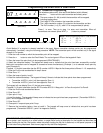
Central Station Receiver 1 Account Number
Press the A button and then directly enter an account number of up to
four digits.
NOTE: Central Station Receiver 2 and 3 Account Numbers can be entered in
Direct Address Programming. See CS Reporting Options.
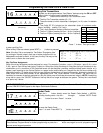
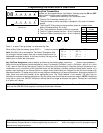
(Direct Entry)
07
INTERIOR
BYPASS FIRE/TBL SYS TBL CHIME
INTERIOR
BYPASS SYS TBL CHIME
FIRE/TBL
(Direct Entry)
08
INTERIOR
BYPASS FIRE/TBL SYS TBL CHIME
INTERIOR
BYPASS SYS TBL CHIME
FIRE/TBL
(Direct Entry)
09
INTERIOR
BYPASS FIRE/TBL SYS TBL CHIME
INTERIOR
BYPASS SYS TBL CHIME
FIRE/TBL
(Direct Entry)
11
INTERIOR
BYPASS FIRE/TBL SYS TBL CHIME
INTERIOR
BYPASS SYS TBL CHIME
FIRE/TBL
(Direct Entry)
12
INTERIOR
BYPASS FIRE/TBL SYS TBL CHIME
INTERIOR
BYPASS SYS TBL CHIME
FIRE/TBL
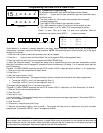
Central Station Receiver 1 Telephone Number
Central Station Account #
For Central Station Telephone and Account Numbers: Use number buttons 1 through 9 for digits 1–9; press
G0 for a zero and G 1 through G 5 for letters B–F, respectively. NOTE: Pre-Dial Delay = “D”;
Dial-Tone Detection = “E”. Pressing the 0 button will produce a blank space (•).
Programming the GEM-P816 & GEM-P1632
6