


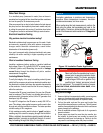
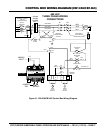
MAINTENANCE
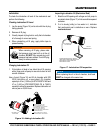
Refer to the the following procedure and Figure 18 for the
removal of the impeller.
1. Remove oil screw and gasket from the oil fill chamber
port. Drain oil from oil chamber as referenced
in Figure 18.
2. Remove the four hex nuts and lock washers that secure
the base plate to the inlet plate.
3. Remove base plate, inlet plate, o-ring and strainer.
4. Next, remove the four bolts and lock washers that
secure pump casing to the seal bracket.
5. Remove pump casing and seal bracket.
6. Remove impeller cap nut and washer from motor shaft.
7. Using a rubber mallot, tap impeller off motor shaft
remove impeller and associated hardware from motor
shaft. If necessary use a puller to remove impeller.
8. Reassemble in reverse order.
1. Clean entire area surrounding mechanical seal.
2. Lubricate mechanical seal with 30 wt. motor oil before
installing back on motor shaft. This lubrication will help
ease the seal back onto the motor shaft.
3. In addition replace o-rings, gaskets and any associated
rubber components that show signs of wear.
4. Inspect and replace if necessary the pump casing
(volute) and seal bracket.
NOTICE
Clearance between impeller and wear plate (pump
casing) should be between .011~.019 in. (0.3~0.5 mm). If
impeller is defective or badly worn, replace immediately.
Figure 18. Impeller Removal
STRAINER
HEX NUT (4)
LOCK WASHER (4)
INLET PLATE
STANDOFF
SCREW
LOCK
WASHER (4)
LOCK
WASHER (4)
PUMP
CASING
IMPELLER
OIL DRAIN
SCREW
GASKET
MOTOR
SHAFT
KEY
CAP NUT
SCREW (4)
ST41230/ST41460
ST61230/ST61460
SEAL
BRACKET