


4
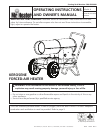
Mr. Heater, Inc. | Kerosene Forced Air Heater Operating Instructions and Owner’s Manual
3. Slide the large washer, then wheel onto the axle next to the
cotter pin.
4. Slide the spacer onto the axle next to the wheel.
5. Slide the partially assembled axle through the wheel support
frame.
6. Slide the spacer onto the axle next to the wheel support.
7. Slide the wheel then large washer onto the axle and hold in
place with the remaining cotter pin.
8. Install the caps over the larger washers to finish the wheel
assembly.
PREPARING FOR OPERATION
1. Check the heater for possible shipping damage. If any is
found, immediately contact the manufacturer at
800-251-0001.
2. Follow all of the “Precautions”.
3. Fill the fuel tank with clean kerosene. In extremely cold
weather, condensation may develop in the tank and it is
recommended that a tablespoon of de-icer be added for
each gallon (4 liters) of fuel in the tank. When filling the
heater, use at least 2 gallons (8 liters) of fuel. Be sure heater
is level and do not overfill. Use a funnel or can with a long fill
spout.
IMPORTANT: Before filling fuel tank the first time or after ex-
tended storage periods, drain the fuel tank of any moisture
or condensation.
4. Locate heater at a safe distance from combustible materials.
Models MH50KR & MH75KTR are not suitable for use on
wood floors or other combustible materials. When used, the
heater should rest on suitable insulating material at least 1
inch thick and extending 3 ft. or more beyond the heater in
all directions.
HEATER START UP
1. MH50KR: Plug the heater into a grounded 115V, 60 Hz, 1 Ø
outlet.
MH75KTR, MH125KTR, MH175KTR & MH210KTR: Turn
thermostat to lowest setting, make sure “On/Off” switch
is “Off”. Plug the heater into a grounded 115V, 60 Hz, 1 Ø
outlet. Turn thermostat to highest setting. Start heater by
pushing toggle switch to “On” position (light signifies switch
is in “ON” position). Adjust thermostat to desired setting.
Heater will cycle on/off as heat is required.
EXTENSION CORD REQUIREMENTS: Up to 100’ (30.5m) use
16 awg. conductor. 101’ - 200’ (30.5 - 61.0m) use 14 awg.
conductor.
For all models:
• In cold weather (below 10° F), starting may be improved by
holding a finger over the vent hole of the pump adjustment
screw cap until the heater starts.
• This unit is equipped with an interrupt circuit. The reset is
integrated into the “On/Off” switch. If the unit does not
start, toggle the switch to “Off”, wait 5 min. and toggle
the switch to “On”.
HEATER SHUT DOWN
1. MH50KR: Unplug heater from power source.
MH75KTR, MH125KTR, MH175KTR & MH210KTR: Push
“On/Off” switch to “Off” position. For extended shutdown,
unplug heater from power source.
RESTART AFTER SAFETY SHUTDOWN (MH50KR, MH75KTR,
MH125KTR, MH175KTR & MH210KTR) See page 7
MH50KR - Unplug unit. Wait 5 minutes. Plug back in.
MH75KTR, MH125KTR, MH175KTR & MH210KTR - Toggle switch to
“OFF” position, wait 5 minutes. Restart.
MAINTENANCE AND STORAGE
WARNING. To prevent personal injury, unplug the heater from the
wall outlet before servicing.
For maximum efficiency and trouble-free service, make the
following periodic maintenance, cleaning and inspections.
ADJUSTING PUMP PRESSURE
Due to varying fuel viscosities and normal component wear the
pump pressure on this heater may need to be adjusted.
ADJUSTMENT PROCEDURE:
Fill fuel tank.1.
Start heater.2.
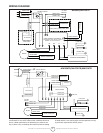
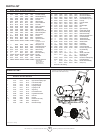
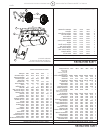
Locate the fuel pressure adjustment screw (ref. #29) in the 3.
exploded parts drawing. The pressure adjustment screw
is located at the rear of the heater, in the air filter housing
cover (approx.2” from the left side and 1” from the top).
Remove and discard the rubber cap (ref. #4) to expose the
screw.
Using a flat bladed screw driver, turn the pump pressure 4.
adjustment screw clockwise to increase pump pressure and/
or counter-clockwise to decrease pump pressure. Base pump
pressures can be found in the specifications chart on page 3
of the “Operating Instructions and Owners’ Manual”.
For best results, the nose cone in the combustion chamber 5.
should be cherry red with no dark spots and the flame
should not extend beyond the nose cone.
IMPROPER PRESSURE ADJUSTMENT
Problem: Heater does not have a strong consistent flame.
Heater smokes and spits raw fuel.
Nose cone does not get cherry red.
Adjustment: Pump pressure is too low.
Turn adjustment screw clockwise to increase pump
pressure.
Problem: Flame extends beyond the end of the heater.
Adjustment: Pump pressure is too high.
Turn adjustment screw counter clockwise to
decrease pump pressure.
DAILY SCHEDULE
1. GENERAL. Make general visual inspection of heater for loose
or damaged parts. Check nuts and bolts to insure against
looseness caused by vibration or rough handling. Damaged
parts should be repaired or replaced before using heater
again. Check heater operation to be sure it is operating
normally (See “Servicing” section for description of normal
operation).
2. FILTERS. Dirty air or fuel filters will cause an imbalance in
the air-fuel mixture. The best indication that this condition
exists is an increase in odors or difficulty getting your heater
to ignite. This heater should never be operated without the
filters in place. If required, clean filters as described under
“500 Hours” and “Annual Schedules”.