


12
CFX Vent Free Fireplace System
20301726
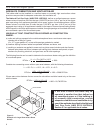
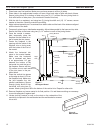
INSTALL MANTEL
1. Place base near final position. Make sure you have access to all four (4) sides.
2. Place sides in the approximate location on base. Align back edge of side with back of base.
Secure joining block #1 to bottom of side using two (2) 1Z\v” screws. Be sure joining block is
flush with bottom of side piece. (Do not attach to base at this time)
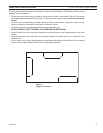
3. With the aid of an assistant, and using two (2) joining block #4 and (12) 1Z\v” screws, secure
header to the sides. Carefully match the moulding.
4. Adjust cabinet assembly so it is centered from side to side and the back of the sides are aligned
with the back of the base.
5. Temporarily place top on side/header assembly. Adjust sides parallel to the base and top side.
Secure the sides to the base using two (2) 1Z\v” screws in each of the joining blocks.
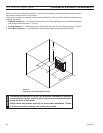
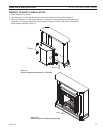
6. Once the mantel is assem-
bled, temporarily place the
fireplace into the mantel in or-
der to locate the trim pieces.
7. Center the fireplace in the
opening with the inside of the
fireplace trim or facing even
with the inside of the front of
the mantel.
8. Attach the horizontal trim
piece to the mantel header.
Make sure the horizontal
trim is centered and there
is an approximate 1/4” gap
between the bottom of the
horizontal trim and the top of
the fireplace. Secure with two
(2) screws; one on each end
of the trim piece in the pre-
drilled holes.
9. Place the vertical trim pieces
so the edge is about 1/4” from
the fireplace body. Make sure
the joint between the trim
pieces is satisfactory. Secure
through joining block #3 into
horizontal trim using two (2)
screws. Attach joining block #2 to the bottom of the vertical trim. Repeat for other side.
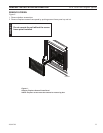
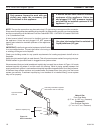
10. Remove fireplace and move mantel to its final position. Cut wall base moulding as necessary
to provide adequate fit against wall.
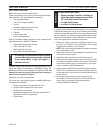
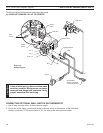
11. Locate (anti-tip) bracket on wall so the cleat on the underside of the
mantel top is captured in the wall bracket and the wall bracket is screwed
into a stud.
KT1233
wall bracket
Figure 8 -
Wall Bracket
Joining Block #4
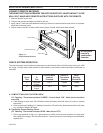
KT1220
assemble surround
Top
Joining
Block #4
Right
Side
Joining
Block #3
Header
Joining
Block #3
Left Side
Joining
Block #2
Joining
Block #2
Joining
Block #1
Base
Joining
Block #1
Vertical
Trim
Vertical Trim
Horizontal Trim
KT1220
Figure 7 -
Barrington Mantel