9
4-2-2 M-NET Setting
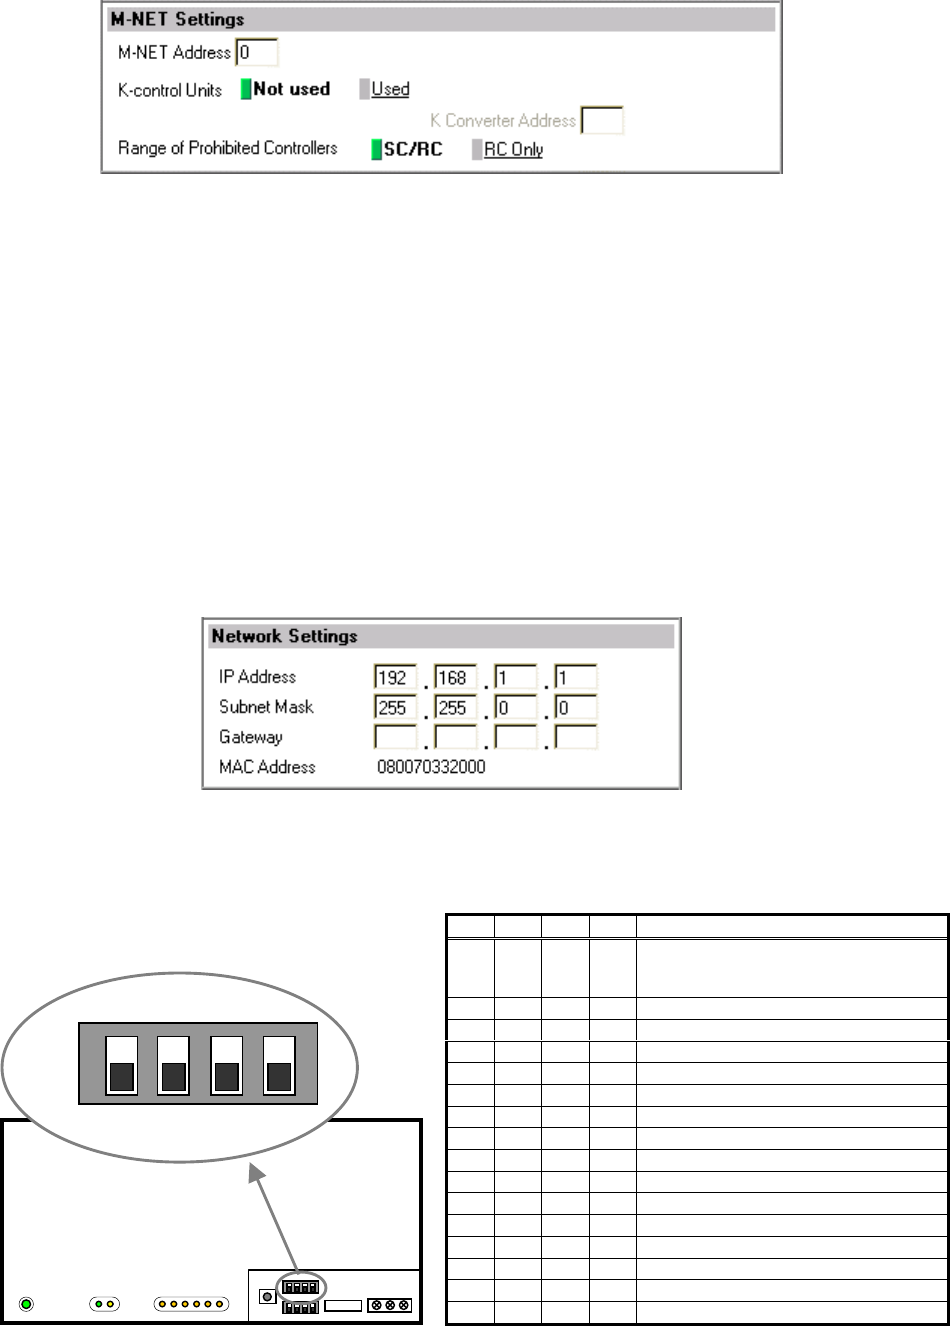
In M-NET Setting, set the G-50A M-NET address, whether or not a K-Control unit is present and which
machines send the prohibited controller command.
(1) Enter the G-50A M-NET address in the [M-NET Address] field. Normally you should enter [0].
(2) When K-Control air conditioners are connected, click [Used] in the [K-Control Units] field and enter the
M-NET address of K transmission converter in the [K Converter Address] field.
(3) If prohibited controller (prohibiting local operation) has been set, this setting determines the scope of this
setting s control, i.e. operation is prohibited for both the remote control and subordinate system controllers,
or just for the remote control. Click [SC/RC] when you want prohibited controllers to include both
subordinate system controllers and the remote control, or click [RC only] when you only want to prohibit
operation on the remote control.
Note: Normally, you should select [SC/RC].
4-2-3 Network Setting
In Network Setting, set the G-50A IP address, subnet mask and gateway address. If connecting to the G-50A
via a permanent LAN, consult with the network administrator before setting these addresses.
[Simple IP address setting of GB-50A]
The IP address that is set on the dip switch (SW2) on GB-50A main body has the priority. (Settings are shown below.)
When activating the value that is set on the initial setting Web, set all the switches on SW2 to OFF.
When the number of GB-50A units is 15 or less, it is recommend to set the IP address using the dip switch (SW2) on
GB-50A main body.
Note: After changing the dip-switch settings, reset the power of GB-50A to activate the changes.
Note: If the IP address of GB-50A is forgotten, check the IP address that is registered on the monitoring PC (Web or TG-2000A) in
use. GB-50A can be started temporarily by using a specified IP address. It is recommended to paste a sticker with the IP
address on the unit, so that the IP address of GB-50A can be available at all times.
123456 LINK/ACT LAN POWER
SW1/2/3 EXT.I/O M-NET
1 2 3 4 IP Address
OFF OFF OFF OFF
IP address set by Initial Setting Web
Note: Default IP address "192.168.1.1".
(Factory setting)
OFF OFF OFF ON 192.168.1.1
OFF OFF ON OFF 192.168.1.2
OFF OFF ON ON 192.168.1.3
OFF ON OFF OFF 192.168.1.4
OFF ON OFF ON 192.168.1.5
OFF ON ON OFF 192.168.1.6
OFF ON ON ON 192.168.1.7
ON OFF OFF OFF 192.168.1.8
ON OFF OFF ON 192.168.1.9
ON OFF ON OFF 192.168.1.10
ON OFF ON ON 192.168.1.11
ON ON OFF OFF 192.168.1.12
ON ON OFF ON 192.168.1.13
ON ON ON OFF 192.168.1.14
ON ON ON ON 192.168.1.15
SW 2
1 2 3 4
ON
OFF


