


7
GB
D
F
SWI
NL
E
P
Caution:
• When the air conditioner is used together with burners, thoroughly ven-
tilate the area. Insufficient ventilation can result in accidents due to oxy-
gen deficiency.
• Never place a burner at a place where it is exposed to the airflow from the
air conditioner.
Doing so can result in imperfect combustion of the burner.
• The microcomputer functions in the following cases:
• Air does not blow out when heating starts.
- To prevent any cool air from escaping.
Wait a moment until the airflow comes out naturally.
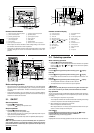
For ventilation
Press the operation mode ( ) button and select the ventila-
tion mode
.
B should be displayed.
• Used to provide ventilation without using the heat or air conditioning functions
of the unit.
• The display will not appear when the ventilation equipment is not at-
tached.
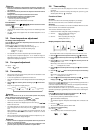
3.3. Room temperature adjustment
To change room temperature
Press the
11
11
1 [room temperature adjustment] button and set the room tem-
perature of your choice.
Pressing
or once changes the setting by 1 °C.
If the pressing is continued, the setting continues to change by 1 °C.
• Indoor temperature can be set within the following range.
Cooling/dry: 19 - 30 °C
Heating: 17 - 28 °C
• It is impossible to set the room temperature by the air-blow operation.
* The range of room temperature display is 8 - 39 °C. Outside this range, the
display flashes either 8 - 39 °C to inform you if the room temperature is lower or
higher than the displayed temperature.
3.4. Fan speed adjustment
Fan speed : 1 stage
Display :
(High)
3.5. Time setting
• Set the current time after turning ON the power of the air conditioner or after
restoration from a power failure.
• It can be set regardless of the operation of the indoor unit.
• During the time operation, the time-setting button becomes void, disabling time
setting.
1. Press the
44
44
4 [time selection] button and bring up the
AA
AA
A “current time”
display
• Every time it is pressed, the display changes.
Caution:
When the current time is not yet set, the “CLOCK (current time)” display
flashes, disabling the setting of timer operation.
2. Set the current time by pressing the
44
44
4 or button
• The time cannot be set while the C “timer on” is displayed.
• While the A “CLOCK” time is displayed, press the time setting 4
/
buttons and set the time.
• The setting advances one minute every time the 4
button is pressed
once, and regresses one minute every time the 4
button is pressed
once.
When respective 4
/ buttons are pressed continuously, the time
display goes forward fast. It advances in the order of 1 minute unit - 10 minute
unit - one hour unit.
• About 10 seconds after the button operation has been completed, the C “cur-
rent time” and A “CLOCK” displays disappear.
Caution:
• Remote controller is equipped with a simplified clock with a precision of
about + or - one minute per month.
• The time must be readjusted (reset) every time the air conditioner is sub-
jected to a power stop of the air conditioner or a power failure.
3.6. Timer setting
• If the timer is set, the unit starts (stops) at the set time, and the time mode is
terminated.
• When you wish to confirm the starting and ending time, press the 4 [time
selection] button while C “
” is displayed.
Function of timer
On-timer
Set the on-timer for the time the working day begins in your company.
When the set start time arrives, the air conditioner starts operation.
Off-timer
Use the off-timer as a reminder to turn off the air conditioner. When the set end-
work time arrives, the air conditioner stops operation.
There are three methods for using the timer.
1. ON/OFF Timer: When setting both starting and ending time
2. On-timer: When only setting the starting time
(Ending time is set to “ - - : - - ”)
3. Off-timer: When only setting the ending time
(Starting time is set to “ - - : - - ”)
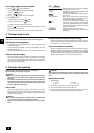
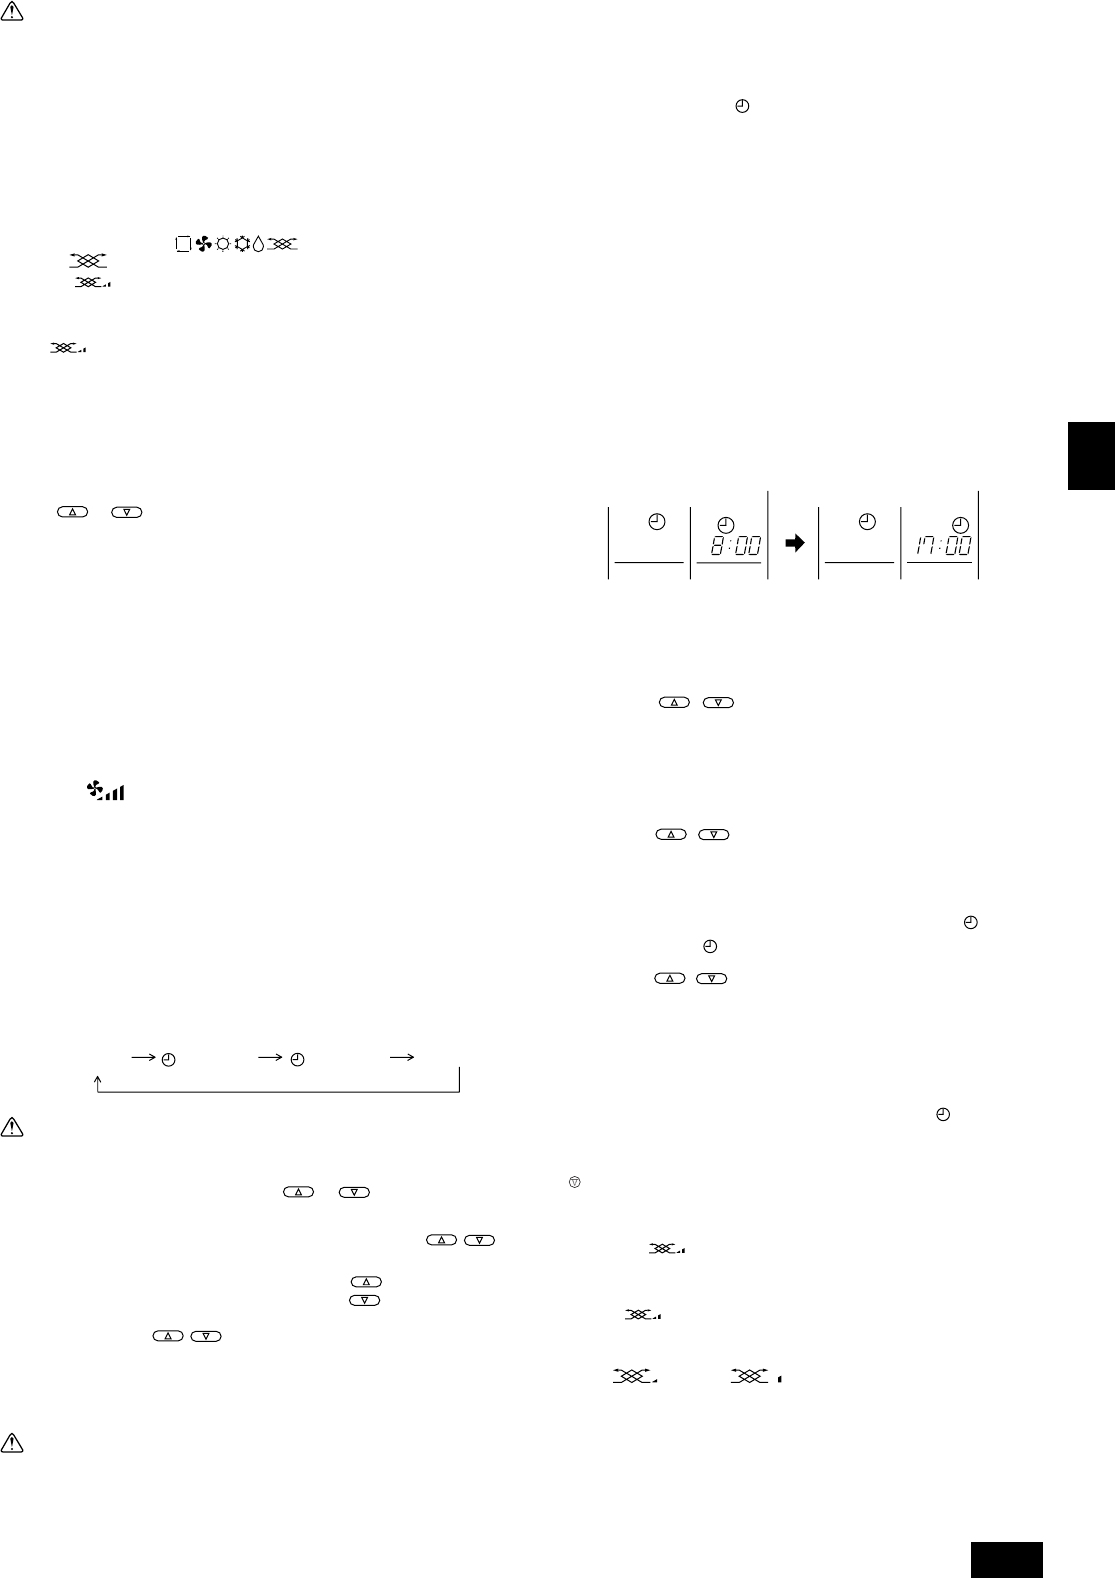
Display example of timer setting
ON OFF
ON OFF
The example shows a timer set for operation start at 8:00 and end at 17:00.
1. Press the
22
22
2 [timer/continuous] button and bring up the
CC
CC
C no display
2. Press the
44
44
4 [time selection] button and bring up the
AA
AA
A “Timer start time”
display
3. Press the
44
44
4
( ) button of the
44
44
4 [time selection] and set the
starting time
When using it as an off-timer, set the starting time to “ - - : - - ”.
The “ - - : - - ” is displayed next to 23:50.
4. Press the
44
44
4 [time selection] button and bring up the
AA
AA
A “Timer end time”
display
5. Press the
44
44
4
( ) button of the [time switch] and set the ending
time
When using it as an on-timer, set the ending time to “ - - : - - ”.
The “ - - : - - ” is displayed next to 23:50.
6. Press the
22
22
2 [timer/continuous] button and bring up the
CC
CC
C “
” display.
Bringing up the
CC
CC
C “
” display completes the setting
Every time the 4
( ) button of the 4 [timer selection] is pressed once, it
advances (or regresses) by 10 minutes.
If the button is pressed continuously, it advances (or retrogresses) continuously.
First set the hour digit and then set the minute digit.
When the ON/OFF timer mode is set, you can run (on-timer) or stop (off-timer)
operation by pressing the B [ON/OFF] button even when there is remaining time.
Release
Press the
22
22
2 [timer/continuous] button and disappear the “ ” display.
1) Ventilator-Airconditioner combined operation
1. If the unit is off, press the B ON/OFF button to turn it on.
The ON indicator should light up.
• The ventilation equipment will operate automatically when connected to the
unit.
2. Press the 8
button.
• You can set the ventilation speed at LOW or HIGH.
2) Changing the ventilation setting
Press the 8
button.
• The setting changes each time the button is pushed.
→
[Low] ← [High]
CLOCK
“current
time”
(no display)
“timer end
time”
“timer start
time”
ON
OFF