24 25
24 25
4. Thelterconsistsoftwosections,both
of which must be cleaned. Brush the
parts with a small brush and/or wash
them in tepid water. Add a little detergent
ifnecessary.Checkthelterpadis
COMPLETELY dry before replacing in the
appliance.NEVERinsertawetlterinto
the appliance.
5. Placethetoppartofthelteronthe
bottompart,andplacethelterinthedust
container.Pressdownthelterfarenough
sothatittstightlytothesidesofthedust
container.Theltercanonlybettedin
one position.
6. Mount the dust container by pressing it
rmlyontothemotorsection.Checkthat
the lock tab (8) on the motor section clicks
into place in the lock hole (10) on the dust
container so that the dust container is
rmlymountedonthemotorsection.
7. Replace the hand-held vacuum cleaner on
the appliance.
CLEANING
• Clean the appliance by wiping it with a
damp cloth. A little detergent can be added
if the appliance is heavily soiled.
• Never use a scouring pad, steel wool or
any form of strong solvents or abrasive
cleaning agents to clean the appliance, as
those may damage the outside surfaces of
the appliance.
• Cleanthelterasdescribedabove.When
thelterpadsarewornorcannotbe
properly cleaned, replace them with pads
of the same type.
• Checkthatthedustcontainerandthelter
are COMPLETELY dry before the appliance
is assembled and used again.
Cleaning the brush of the oor nozzle
Thereisarotatingbrushintheoornozzle.
The brush must be cleaned if it becomes
covered in hair or other substances.
1. Switch appliance off.
2. Detachtheoornozzlefromtheappliance
by loosening the mounting screw at the
backoftheconnectorontheoornozzle
andslidingofftheoornozzle.
3. Turntheoornozzleupsidedownsothat
you can see the rotating brush.
4. Loosenallscrewsonthebackoftheoor
nozzle using a philips screwdriver and
separatethetwohalvesoftheoornozzle.
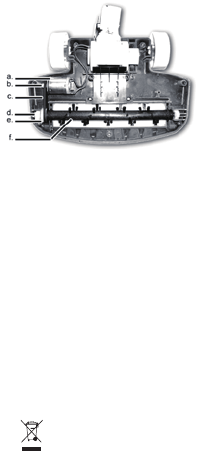
5. Grab the two white plastic dowels (d) at
eiher side of the brush (f) and carefully lift it
offtheoornozzle.
6. Detach the belt (c) from the belt drives (b
and e).
7. Remove
hair,bers
and dust
from the
brush.
8. Reattach
the brush:
First place
the belt
around the belt drive (e) of the brush, then
place the belt around the belt drive (b) of
the drive unit (a). Press the white dowels
rmlyintotheholderssothatthebrush
rests in the grooves.
9. Reattachthebackoftheoornozzleso
thatthescrewholesttogetherandpress
it into position until a click is heard. Make
sure,thetwopartsttightlyalltheway
round.
10. Screw back all the screws.
INFORMATION ON DISPOSAL AND
RECYCLING OF THIS PRODUCT
Please note that this Adexi product is marked
with this symbol:
This means that this product must not be
disposed of along with ordinary household
waste, as electrical and electronic waste must
be disposed of separately.
In accordance with the WEEE directive, every
member state must ensure correct collection,
recovery, handling and recycling of electrical
and electronic waste. Private households in
the EU can take used equipment to special
recycling stations free of charge. In certain
member states, used apparatus can be
returned to the dealer where they were bought
on the condition you buy new products.
Contact your retailer, distributor or the
municipal authorities for further information on
what to do with electrical and electronic waste.


