14
INTRODUCTION
To get the best out of your new apparatus, please read this user guide carefully
before using it for the rst time. We also recommend that you keep the instructions
for future reference, so that you can remind yourself of the functions of your
apparatus.
SAFETY MEASURES
• Incorrect use of this appliance and its accessories may cause personal injury
and damage.
• Use for its intended purpose only. The manufacturer is not responsible for any
injury or damage resulting from incorrect use or handling (see also Guarantee
Terms).
• For domestic use only. Not for outdoor or commercial use.
• For connection to 230 V, 50 Hz only.
• Do not place in water or any other liquid.
• Never touch the appliance, accessories, cord or plug with wet or damp hands.
• Keep children under supervision when in use.
• Keep the appliance and accessories away from heat sources, hot objects and
naked ames.
• Always switch off when not in use, before cleaning the dust holder, brush head
or lters.
• Do not use if the exhaust lter, dust holder and lter are not tted, as this could
damage the appliance.
• Only use accessories manufactured or recommended by the manufacturer.
• Do not use it on wet surfaces.
• Do not use to vacuum up matches, hot ashes, cigarette butts, hard or sharp
objects, wet or damp substances, combustible materials (petrol, solvents, etc.)
or vapour from these.
• Do not use to vacuum ne sand or dust – e.g. plaster, brick dust and the like.
• Do not cover the appliance’s suction or exhaust port.
• Ensure that you keep clothing, hair and body parts away from the nozzle and
moving parts of the appliance.
• Check for damage to cord or plug regularly. Do not use if they are damaged. Do
not use if the appliance or accessories have been dropped or damaged in any
other way.
• If the appliance or accessories are damaged, it must be inspected and, if
necessary, repaired by an authorised repairman; otherwise, there is a risk of
electric shock. Never try to repair the appliance or accessories yourself. Please
contact the store where you bought the appliance for repairs under guarantee.
Unauthorised repairs or modications will invalidate the guarantee.
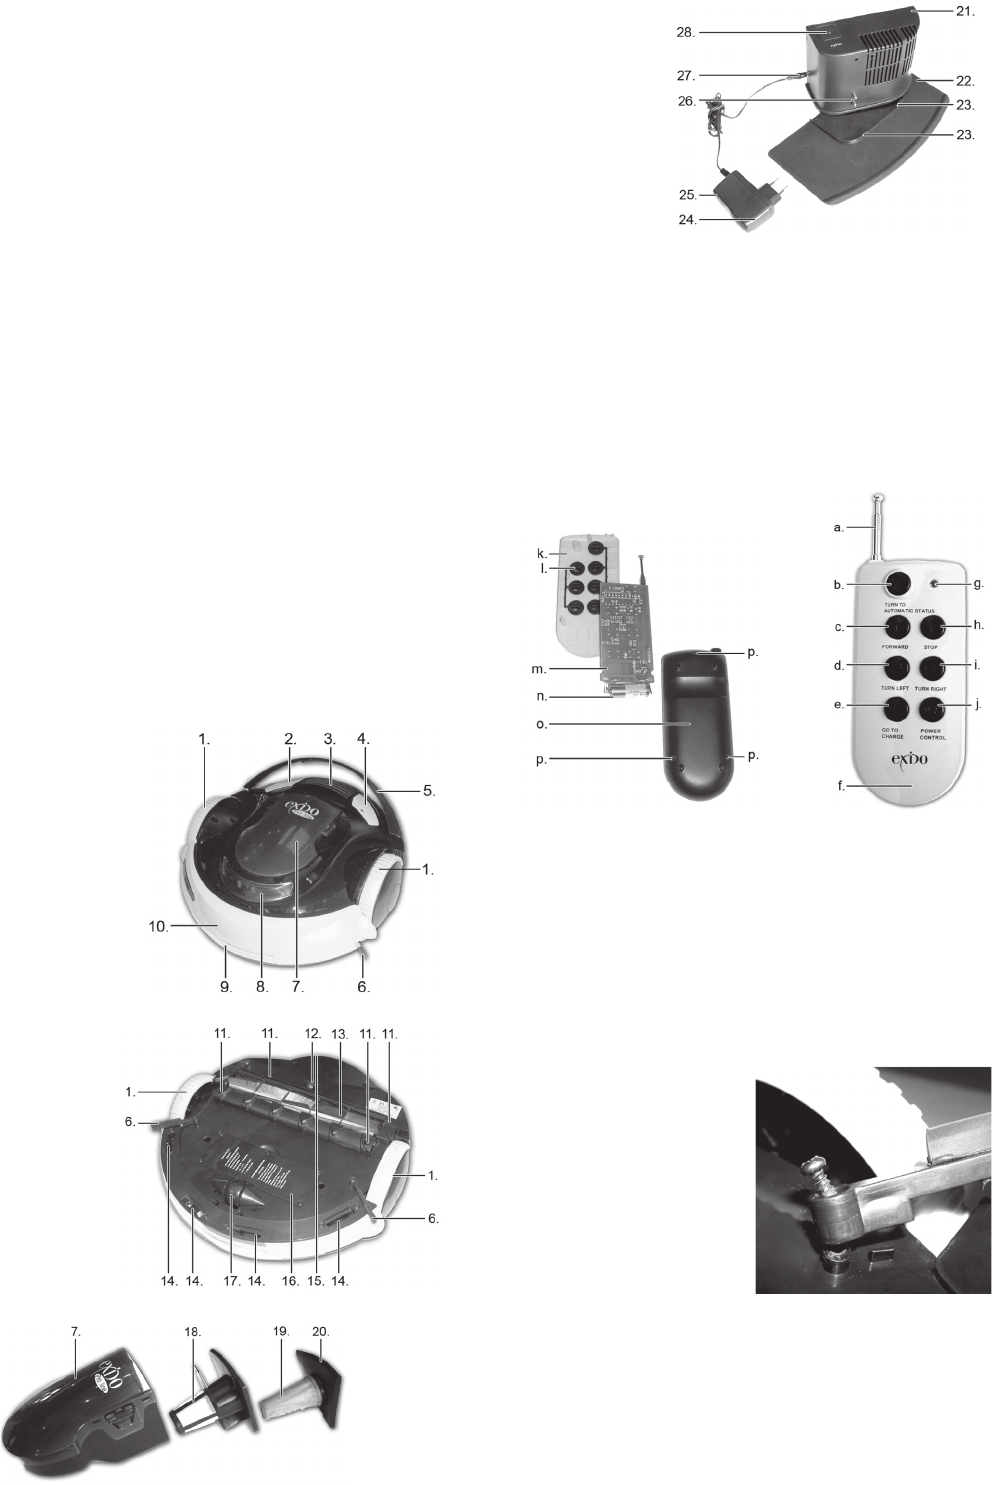
KEY TO MAIN COMPONENTS
1. Drive wheel
2. Room size setting button
3. Exhaust lter
4. On/off button
5. Carrying handle
6. Brush
7. Dust container
8. Front sensor
9. Charger contact
10. Bumper sensor
11. Screws
12. Small jockey wheel
13. Rotating brush head
14. Edge sensor
15. Charge jack and indicator
16. Battery compartment lid
17. Large jockey wheel
18. Filter funnel
19. Dust lter
20. Dust lter holder
21. Charging station
22. Base plate (with double-
sided tape on underside)
23. Lock pins
24. Adapter and plug
25. Charge indicator
26. Charger contacts (on charger
station)
27. Charging socket
28. Signal indicator
a. Antenna
b. Return to automatic status button
c. Forward button
d. Turn left button
e. Go to charge button
f. Remote control
g. Indicator
h. Stop button
i. Turn right button
j. Power control button
k. Front
l. Button panels
m. Circuit board
n. Battery (type 23A, 12 V)
o. Back
p. Screws
PREPARATION
Preparing charging station
• Fit station (21) to base plate (22). Lock pins (23) must engage slots along station
edge.
• Place station in middle of room against a wall, or near a plug socket.
o Ensure appliance has unhindered access to charging station.
o Station can be secured to oor using the double-sided tape on underside.
• Place the plug (27) in the socket.
• Plug adapter (24) in and switch the power on.
• Signal indicator (28) will ash to indicate signal is being sent to appliance on
charging station location.
• Charge indicator (25) will be green as long as charging is in progress.
Assembly before use:
• Fit the two brushes (6) in the base of the
appliance (see picture):
1. Turn appliance upside down.
2. Press brushes down over the plastic
studs.
3. Screw carefully until secure using a
small Phillips screwdriver.
• Ensure dust holder (7) and lter parts
(18, 19 and 20) are correctly tted (see
Cleaning dust holder, lters and brush
heads below).
• Check both drive wheels (1) and jockey
wheels (12 and 17) and the rotating brush
head (13) can move freely.
• Check front sensor (8) and edge sensors (14) are not covered or dirty.
UK


