


10
11
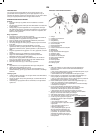
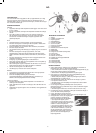
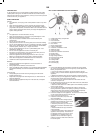
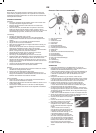
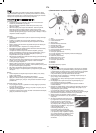
Nozzles
The appliance comes with one floor nozzle and one combination nozzle.
Nozzle Use
Floor nozzle (6) All types of flooring, with or without carpet
Combination nozzle (5) Radiators, nooks and crannies, skirting
boards, furniture, blinds, lampshades,
shelves and bookcases.
• The floor nozzle has two settings. When cleaning hard surfaces
(wooden or stone floors, tiles, etc.), the nozzle brushes should be
extended. When cleaning carpets and rugs, the brushes should be
retracted into the nozzle. Press the brush change button (7) to switch
between the two settings.
• The combination nozzle has two settings. When cleaning radiators,
nooks and crannies and skirting boards, the nozzle brushes should
be extended. When cleaning furniture, blinds, lampshades, shelves
and bookcases, the brushes should be retracted into the nozzle.
Tip:
• If, while vacuuming with the floor nozzle, you need to stop briefly to
move furniture or similar items, you can insert the parking fixture on
the back of the nozzle into the parking holder (19) on the back end of
the appliance.
• The bag change indicator (15) will normally be blue. If it changes to
red when the appliance is being used, or if the suction strength is
significantly reduced, the dust bag must be changed (see below). If
the indicator remains red after the bag has been replaced, it may be
due to one of the following reasons:
o The hose or nozzle is clogged.
o The air filter is dirty.
• Investigate what is causing the indicator to remain red and deal with
the problem. The appliance must not be used if the indicator is red.
This may cause irreparable damage to the motor.
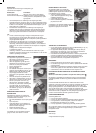
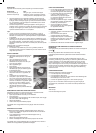
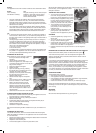
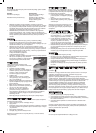
CHANGING THE DUST BAG
If the appliance’s suction strength is reduced,
this may be because the bag needs
changing.
• Lift the nozzle up off the floor.
• Switch the appliance on, and keep an eye
on the bag change indicator. If it is red, the
bag must be changed.
• Switch the appliance off again.
• Detach the hose.
• Open the dust bag cover by pressing
the handle (16) in, and flipping the cover
upwards until it locks into place.
• Carefully remove the plastic rails holding
the dust bag from the base of the
appliance (see picture).
• Remove the dust bag from the plastic
rails.
• Throw the bag in the bin. Make sure that
there are no holes in it. Do not fold it.
• Slide a new dust bag onto the rails,
and insert the rails in the base of the
appliance. Check that the bag is fitted
correctly and that it is the right way up.
Never use the appliance unless it has a
dust bag fitted.
• Close the cover and ensure it clicks into place.
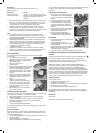
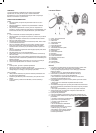
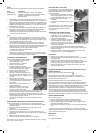
CLEANING/REPLACING THE MOTOR FILTER
The motor filter is the filter behind the dust bag. The appliance must not
be used if there is no motor filter fitted.
• Open the dust bag cover by pressing the handle in.
• Remove the dust bag.
• Pull the filter holder up (see picture), and replace the filter pad, or
clean it as described under Cleaning.
• Replace the filter holder.
• Remember to replace the dust bag.
We recommend cleaning the filter at least twice a year, or whenever it is
dirty.
CHANGING THE AIR FILTER
The air filter at the back, which can be found behind the exhaust grille,
filters the appliance’s exhaust air. The appliance must not be used if there
is no air filter fitted.
• Remove the exhaust grille by pressing the release button forward and
flipping the exhaust grille up.
• Replace or clean the filter pad.
• Fit the exhaust grille so it locks into place with a click.
We recommend replacing the air filter after 4 to 6 months’ use, when it
becomes dirty, or if the appliance’s suction
strength is reduced.
TRANSPORT AND STORAGE
• You can lift and carry the appliance using
one of two carrying handles (11 and 17).
Never pull or lift the appliance by the cord.
• Before putting the appliance away, rewind
the cord. Switch off at the socket, unplug,
and press the automatic cord rewind
button (12) until the cord is fully rewound.
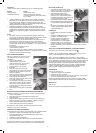
• The combination nozzle can be stored
in the holder on top of the appliance
(see picture) or in the holder (9) on the
telescopic tube.
• The floor nozzle can be parked in the
parking holder (18) underneath the
appliance when the appliance is put away.
CLEANING
• Clean the appliance by wiping it with a
damp cloth.
• You must not use any form of solvent, or
strong or abrasive cleaning agent.
• Clean the filter pads from the motor filter
and air filter by rinsing them in hot water and leaving them to dry.
Never insert a wet filter into the appliance.
• Replace the filters once they become worn or can no longer be
cleaned.
INFORMATION ON DISPOSAL AND RECYCLING OF THIS PRODUCT
Please note that this Adexi product is marked with this symbol:
This means that this product must not be disposed of together with
ordinary household waste, as electrical and electronic waste must be
disposed of separately.
In accordance with the WEEE directive, every member state must ensure
correct collection, recovery, handling and recycling of electrical and
electronic waste. Private households in the EU can take used equipment
to special recycling stations free of charge. In some member states you
can, in certain cases, return the used equipment to the retailer from
whom you purchased it, if you are purchasing new equipment. Contact
your retailer, distributor or the municipal authorities for further information
on what you should do with electrical and electronic waste.
GUARANTEE TERMS
The guarantee does not apply:
• if the above instructions are not followed
• if the appliance has been interfered with
• if the appliance has been mishandled, subjected to rough treatment,
or has suffered any other form of damage
• if faults have arisen as a result of faults in your electricity supply.
Due to the constant development of our products in terms of function
and design, we reserve the right to make changes to the product without
prior warning.
IMPORTER
Adexi Group
We cannot be held responsible for any printing errors.