


10
11
INTRODUCTION
To get the best out of your new appliance, please read this user guide
carefully before using it for the first time. We also recommend that you
keep the instructions for future reference, so that you can remind yourself
of the functions of your apparatus.
SAFETY MEASURES
General
• The appliance, cord or plug must not be placed in water or any other
liquid.
• Never touch the appliance, cord or plug with wet or damp hands.
• Never try to repair the appliance yourself. If the apparatus, cable or
plug needs to be repaired, it should be taken to an authorised service
centre. Please contact the store where you bought the appliance for
repairs under guarantee.
Use
• The appliance is for indoor domestic use only.
• Never use the appliance if it, the cord or plug is damaged or if the
appliance is not functioning correctly.
• Only use accessories manufactured or recommended by the
manufacturer.
• Do not use it on wet surfaces.
• Take particular care when vacuuming stairs, due to the risk of falling.
• Do not use the appliance to vacuum up matches, hot ashes, cigarette
butts, hard or sharp objects, wet or damp substances, combustible
materials (petrol, solvents, etc.) or vapour from these.
• Do not use the appliance to vacuum up fine building dust – from
plasterboard, bricks, etc.
• Do not cover the appliance’s suction or exhaust port.
• Ensure that you keep clothing, hair and body parts away from the
nozzle and moving parts of the appliance.
• Switch the appliance off and unplug it when it is not in use, and
before you change the dust bag or clean or replace the filters.
• Never leave the appliance unattended when it is switched on.
• Children should be supervised when using it.
Batteries
• Remove the batteries if the appliance is not to be used for a
prolonged period.
• Always replace both batteries at the same time.
• Never mix different types of battery (e.g. manganese dioxide batteries
and alkaline batteries), old and new batteries or different makes of
battery.
Cord and plug
• Avoid pulling the cord when removing the plug from the socket.
Instead, hold the plug.
• Keep hold of the plug when rewinding the cord, so that it does not
strike the appliance.
• Keep the cord and appliance away from heat sources, hot objects
and naked flames.
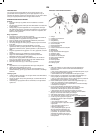
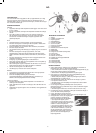
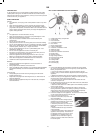
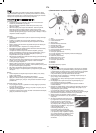
KEY TO MAIN COMPONENTS OF THE APPARATUS
1. Hose
2. Handle with battery compartment
3. Control panel
4. Hose connector
5. Combination nozzle
6. Floor nozzle
7. Brush change button
8. Locking mechanism
9. Holder for combination nozzle
10. Telescopic tube
11. Carrying handle
12. Button for automatic cord rewind
13. On/off button
14. Infrared receiver
15. Bag change indicator
16. Dust bag cover handle
17. Carrying handle
18. Parking holder
19. Parking holder
20. Cord and plug
USE
1. Insert 2 AAA batteries into the battery compartment in the handle
(2). Check that the batteries are in the right way round! Replace the
battery compartment cover.
o If you do not insert any batteries, the control panel (3) will not
function, and you will be unable to adjust the suction strength of the
appliance.
o Replace the batteries when the control panel no longer functions.
2. Attach the hose (1) to the appliance by fitting the hose connector (4)
into the suction nozzle until it clicks into place.
o To remove the hose, press the buttons on the side of the hose
connector and pull it out.
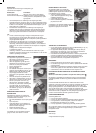
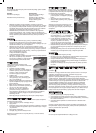
3. Fit the telescopic tube (10) into the other end of the hose, and attach
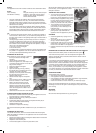
a nozzle to the end of the tube.
o See the Nozzles section for a description of the intended purposes
of the various nozzles.
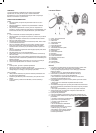
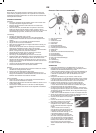
4. You can adjust the length of the telescopic tube by pushing the
locking mechanism (8) down and pulling or pushing on the bottom
section of the tube until it reaches a suitable length (see picture).
o When parking, shorten the tube as far as possible.
5. Pull the cord (20) out of the appliance. The cord must not be pulled
out any further than the red mark on the cord.
6. Plug in and switch the power on.
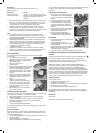
7. Press the on/off button (13) to start and
stop the appliance.
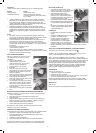
8. During use the suction strength can be
adjusted using the buttons on the control
panel on the front of the handle.
o Press the plus button (c) or the minus
button (b) to increase or decrease suction
strength.
o Press the MAX button (a) to maximise
suction strength.
o Press the switch button (d) to switch the
appliance off temporarily. The red LED in
the infrared receiver (14) comes on when
the appliance is in standby mode. The
appliance can be switched on again by
pressing one of the three other buttons on
the control panel.
UK