


12
NOTE: DIAGRAMS & ILLUSTRATIONS ARE NOT TO SCALE.
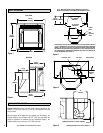
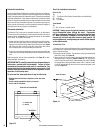
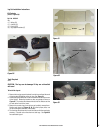
Wiring Block
B
A
Rear View of Control Board
Door Trim Installation Instructions
Parts List (A)
Qty
(2) Trim Pieces (Gold, Nickel, Brushed Nickel or Black Nickel)
(6) #10 nuts
(6) #10 washers
Tools Needed
Qty
(1) 3/8” nut driver or socket wrench
CAUTION: Always ensure that plated surfaces are clean and
free of fingerprints before lighting the insert. Fingerprints
will leave permanent blemishes if left on plated surface when
lit. When installation is complete, the trim should be gently
cleaned with soft cloth and either alcohol or glass cleaner. Do
not overtighten nuts, overtightening can create visible dimples
on the plated surface.
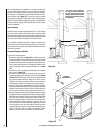
To Install Door Trim:
1. Remove the trim pieces and hardware from its packaging and ensure
that all pieces are present before beginning installation. Take care not to
scratch finished surfaces.
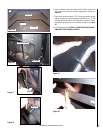
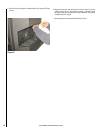
2. Open right and left side door. The side doors swivel open towards the
back of the insert. See Figure 16.
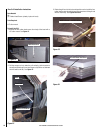
3. Open front door. Put trim in place by inserting trim studs into the cor-
responding holes in the door (Figures 14 and 15). The top piece of
trim will only fit in one direction, but the bottom piece can be installed
incorrectly. When placing the bottom piece of trim, make sure there
is a 9/16” gap between the top of the trim piece and the glass in the
door. See Figure 18.
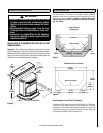
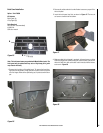
Pellet Stove Door
Trim Pieces
Figure 14
Figure 13
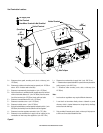
Outside Air Installations
Connecting the Winslow PI40 insert to outside combustion air is optional,
except in mobile home installations and when required by local building
codes. The fireplace insert’s air intake will accept 2” ID pipe to accommodate
outside air installations. The air intake on the exterior of the home should
always be located substantially below the flue termination and terminate
with a cover to keep out weather and pests. The outside air pipe may run
up the chimney, horizontally, or down provided the structural integrity of
the fireplace and chimney system are maintained.
Thermostat installation
The Winslow PI40 insert can be operated manually or by thermostat.
The insert comes from the factory wired to operate manually, see control
board operation on Page 18. A low voltage thermostat can be installed
on the insert. To install the thermostat:
1. Unplug the insert from the electrical outlet. Open the right side door
and lift out the control board from its retaining brackets. Locate the
light green wiring block at the bottom back of the board (see Figure
13), loosen the two screws B at the back of the block, and remove
the U shaped jumper wire A protruding from the block.
2. Insert a wire from the thermostat into one of the slots from which the
jumper wire was removed. Repeat this process for the other thermostat
wire.
Retain the jumper wire for future reinstallation. See Page 18 for ther-
mostat operation instructions.
IMPORTANT NOTE: Install the thermostat per the manufacturers
instructions, provided with the thermostat. Failure to follow
manufacturers instructions could result in a malfunction. Pay
special attention to the thermostat location requirements. If the
location requirements are not adhered to the appliance, erratic
operation or failure may occur.
Do not mount the thermostat where it may be affected by:
• Radiant heat from the insert, fireplaces, sun or other heat
sources.
• Drafts or dead spots behind doors or in corners.
• Hot or cold air from ducts.
A = Jumper Wire
B = Screws
Pellet Insert Door
Trim Pieces
A
B
Rear View of Control Board
Wiring Block