


Caution:
Before plugging vacuum into outlet, make sure outlet voltage is same as voltage
rating given on
vacuum
nameplate.
1.
Insert
the
large
end
of
the
hose
into the
side
inlet
fitting.
2.
Attach cleaning tools to the other end of the hose.
3.
Prepare the unit for Dry Pick-Up or Wet Pick-Up as follows:
A.
Dry
Pick-Up Operation
WARN
IN
G
-
ALWAYS
DISCONNECT
THE
PLUG
FROM
THE
WALL OUTLET BEFORE REMOVING THE TANK COVER. TO PICK UP DUST
AND DRY MATERIAL, YOU MUST ADD A CARTRIDGE FILTER TO ENSURE
PROPER FILTRATION. ENSURE CARTRIDGE FILTER
IS
COMPLETELY DRY
BEFORE OPERATION. BE SURE THAT CARTRIDGE FILTER
IS
IN POSITION
OVER THE FILTER CAGE COVERING ALL OPENINGS. SEE THE ENCLOSED
CARTRIDGE FILTER MAINTENANCE SHEET
FOR
INSTALLATION, OPERA-
a
TION AND CLEANING OF THE CARTRIDGE FILTER.
a
CAUTION
-KEEP
FILTERS
CLEAN.
Efficiency of the vacuum is largely dependent on the cartridge filter. A clogged filter can
cause overheating and possibly damage the cleaner. Filters should be removed periodically
and cleaned and be replaced as required. Should the cartridge filter be punctured
-
it
must
be replaced.
B. Wet Pick-Up Operation
a
WARNING:
ALWAYS DISCONNECT THE PLUG FROM THE
WALL OUTLET BEFORE REMOVING THE TANK COVER. THE CARTRIDGE
FILTER CAN BE USED FOR BOTH WET AND DRY PICK-UP.
NOTE BE SURE CARTRIDGE FILTER
IS
CLEAN PRIOR TO WET PICK-UP.
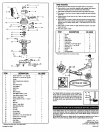
SHOULD SERVICING BE REQUIRED, REFER TO THE REPLACEMENT PARTS
ILLUSTRATION FOR PURPOSE OF DISASSEMBLY AND REASSEMBLY.
REPLACE ALL WORN
OR
DAMAGED PARTS.
~
a
WARN
IN
G
-
BE
SURE
TO
DISCONNECT
POWER
SUPPLY
I
BEFORE ATTEMPTING TO SERVICE
OR
REMOVE ANY COMPONENTS.
No lubrication is necessary as the motor is equipped with lifetime lubricated bearings.
a
DANGER
-
THIS
EQUIPMENT
INCORPORATES
PARTS
SUCH AS
a
WARNING
-
IF
ANY
OF
THE
MOTOR
HOUSING
PARTS
SHOULD
SWITCHES, MOTORS,
OR
THE LIKE, THAT TEND TO PRODUCE ARCS
OR
SPARKS, THAT CAN CAUSE AN EXPLOSION. WHEN LOCATED IN GASOLINE-
DISPENSING
OR
SERVICE STATIONS INSTALL AND USE AT LEAST
20
FEET
HORIZONTALLY FROM THE EXTERIOR ENCLOSURE OF ANY DISPENSING
PUMP AND AT LEAST
18
INCHES ABOVE A DRIVEWAY
OR
GROUND LEVEL.
BECOME DETACHED
OR
BROKEN, EXPOSING THE MOTOR
OR
ANY OTHER
ELECTRICAL COMPONENTS, OPERATION SHOULD BE DISCONTINUED
IMMEDIATELY TO AVOID PERSONAL INJURY
OR
FURTHER DAMAGE TO
THE VACUUM. REPAIRS SHOULD BE MADE BEFORE USING THE VACUUM.
This cleaner is equipped with an automatic shut-off that
operates when picking up liquids.
As
the level of the liquid
rises, an internal float rises until
it
seats itself against a seal
at the intake of the motor, shutting
off
suction. When this
happens, the motor
will
develop a higher than normal pitch
noise. To continue use, empty the liquid waste from the tank
as outlined in the previous paragraph.
NOTE
IF
ACCIDENTLY TIPPED
OVER,
THE VACUUM COULD
LOSE ITS SUCTION.
IF
THIS OCCURS, PLACE VAC IN
UPRIGHT POSITION AND TURN SWITCH OFF. THIS WILL ALLOW THE FLOAT TO RETURN TO
ITS NORMAL POSITION, AND YOU WILL BE ABLE TO CONTINUE OPERATION.
Using
Your Master Nozzle
Your wet/dry vacuum comes equipped with a revolution in vacuum
cleaners. ONE NOZZLE
DOES
IT ALL!
The brush and squeegee inserts can be inserted in the nozzle by
aligning the insert with the opening in the nozzle and apply pressure
until the insert is firmly in place
Before storing your cleaner, the tank should be emptied and cleaned. The power cord can be
wound around the housing of the unit for convenience, Accessories may be stored in
the
tank
while those that cannot be stored in the tank should be kept in the same area as the cleaner
so
they can be readily available. The cleaner should be stored indoors.
I I
Symptom Possible Cause(s) Corrective Action
Vacuum will not start
Dust blowing
Loss of vacuum
1.
Defective switch
2.
Defective motor
Filters not functional
1.
Loose
hose
connection
2.
Filter clogged
3.
Full tank
4.
Hole in hose
1.
Replace switch
2.
Replace motor
Clean or replace filters
1.
Tighten hose connection
2.
Clean or replace filter
3.
Empty machine
4.
Replace hose