


- 7 -
LOUVRE REMOVAL
SERVICE INSTRUCTIONS
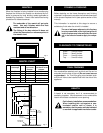
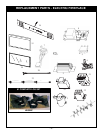
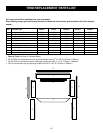
To remove top louvre pull louvre up and then lift out.
See Figure 5.
Disconnect power before attempting any
maintenance or cleaning to reduce the risk
of fire, electrical shock or personal injury.
GLASS INFORMATION
1. Under no circumstances should this product be
operated with missing or broken glass.
2. Do not strike or slam the glass.
3. Do not use abrasive cleaners to clean the glass.
4. This product uses tempered glass. Replacement of
the glass with gasket as supplied by the manufac-
turer should be done by a qualified service person.
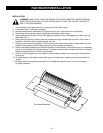
REPLACING LIGHT BULBS
This fireplace uses three (3) clear 120 Volt, 60 Watt, E-
12 and one (1) clear 120 Volt, 5 Watt, E-12 socket base
light bulbs. (Small base, chandelier candle type). Three
(3) of the lights are located under the ember bed of the
unit. The fourth (4) light is found at the top of the firebox
above the log set. For convenience, if one of the bulbs
burns out, it may be a good idea to replace all of the light
bulbs.
Do not exceed 60 Watts per bulb. Use of
higher rated bulbs may result in a fire,
causing property damage, personal injury
or loss of life.
1. Turn off power to the unit.
2. Let fireplace cool if it has been operating.
3. Remove top louvre. (See Louvre Removal).
4. Remove glass door. (See Glass Frame Removal).
5. Remove the two screws securing the ember bed in
position. One screw is located on either side of the
ember bed near the front.
6. Examine the bulbs to determine which bulbs need to
be replaced.
7. While holding the socket, unscrew the defective
bulb(s).
8. Install the new light bulb(s) by screwing in while
holding the socket.
9. Reinstall ember bed, log set, glass door and top
louvre.
GLASS
PANEL
LOUVRE
1.
2.
Fig. 5
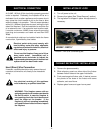
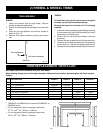
GLASS FRAME REMOVAL
1
. Remove the top louvre. (See "Louvre Removal" section)
2. Open the access door.
3. Remove two machine screws from the bottom of glass
frame.
4. Lift up and unhook glass frame at the top.
Before remounting glass frame, brass trim
must be installed. See instructions in
"Frame Mounting" section.
GLASS FRAME
SCREWS
OPEN ACCESS DOOR
MACHINE SCREWS
Fig. 6