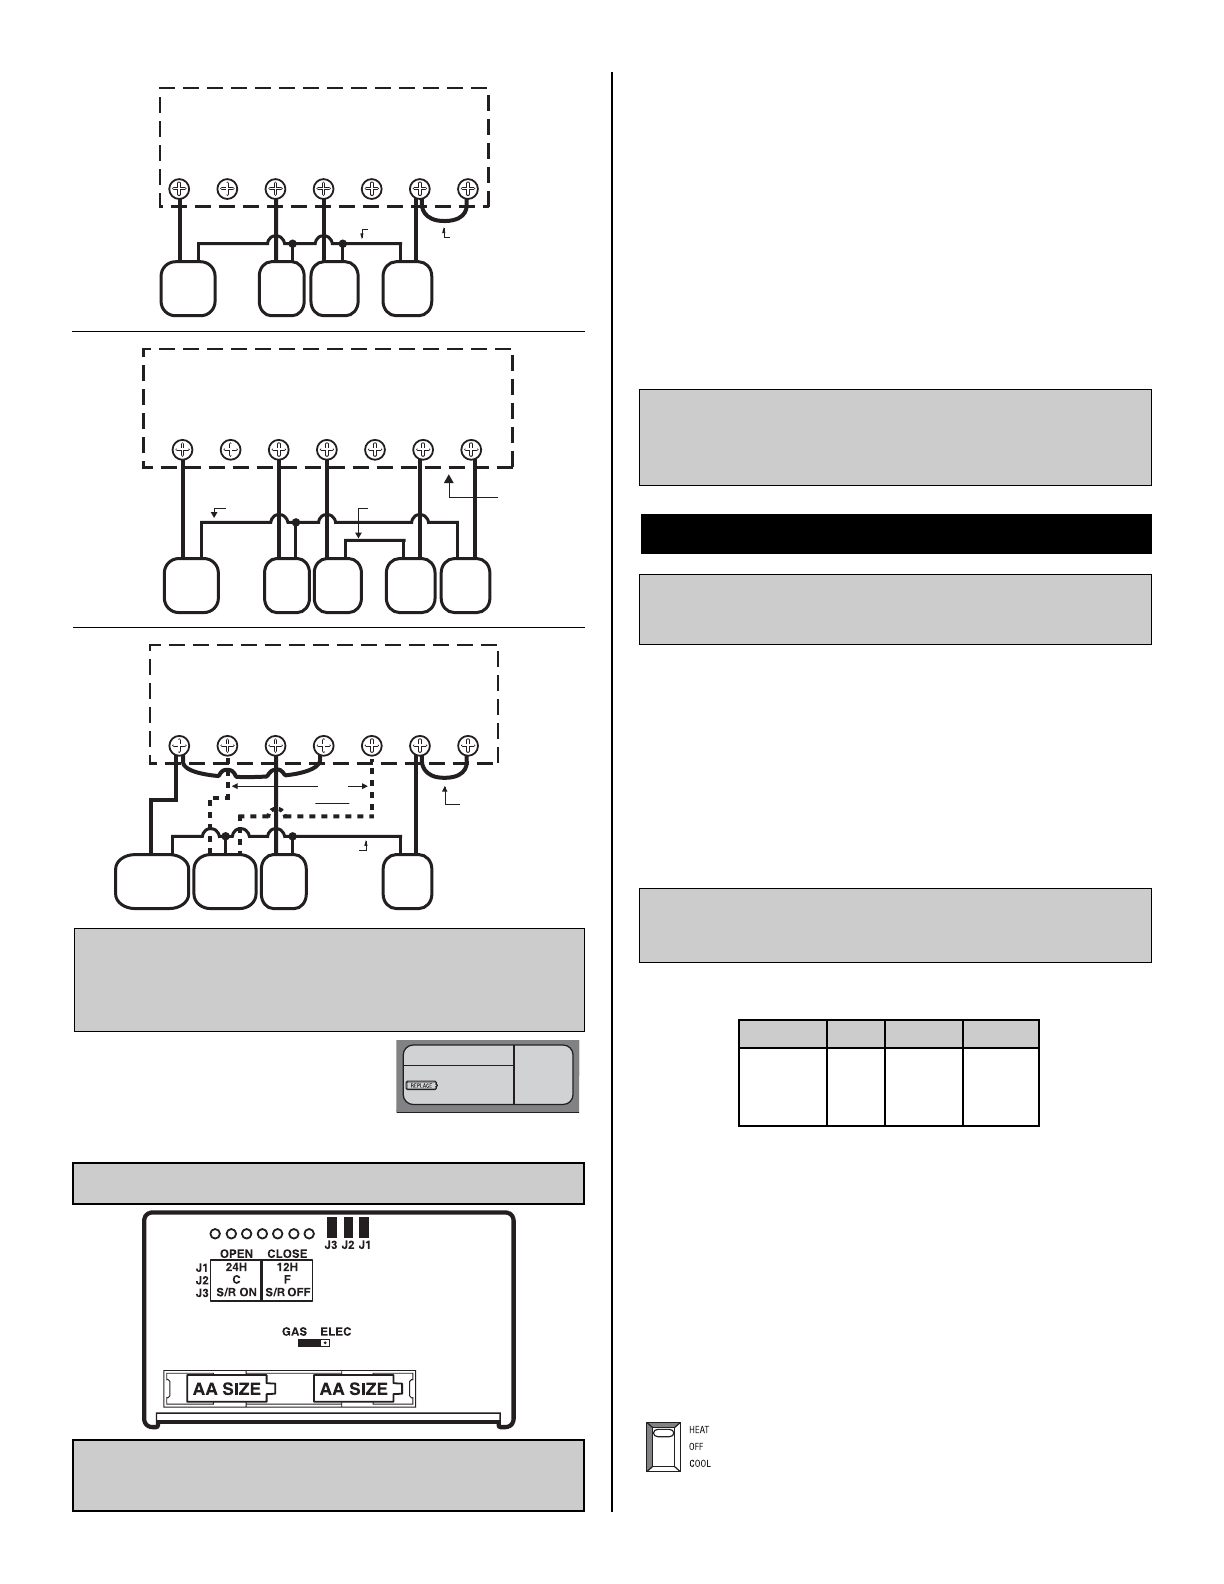
TYPICAL 24 VAC 4-WIRE HOOKUP
SINGLE STAGE HEAT AND COOL
Y O G W B RH RC
Gas
Valve
or
Heater
FAN
A/C
Comp.
System
XFMR
RH-RC JUMPER
PROVIDED
COMMON
TYPICAL 2-TRANSFORMER 24-VAC 5-WIRE HOOKUP
SINGLE STAGE HEAT AND COOL
Y O G W B RH RC
Gas
Valve
or
Heater
FAN
A/C
Comp.
Heat
XFMR
Cool
XFMR
RH-RC JUMPER
REMOVED
COMMON 2
COMMON 1
TYPICAL SINGLE-STAGE HEAT PUMP HOOKUP
Y O G W B RH RC
FAN
Heat Pump
Compressor
System
XFMR
Reversing
Valve
RH-RC JUMPER
PROVIDED
USE
B or O
NOT BOTH
SYSTEM
COMMON
REPLACE BATTERIES WHEN
INDICATOR APPEARS
NOTE
When replacing batteries, you have
approximately 1 minute before programs are lost.
NOTE
If you have an electric system and the blower does not operate after
installation, find the electric/gas heat selector on the back of the body.
Move the selector to the ELEC position.
WARNING: Use Energizer
®
or DURACELL
®
Alkaline Batteries Only.
INSTALLING BATTERIES
The Unit requires batteries to operate your furnace
and retain its programming in memory. Replace
the batteries when the REPLACE indicator
appears in the display or at least once a year.
The Unit alternately displays the current time and the room temperature.
It also displays the day of the week and the currently active program
period that is controlling the temperature: MORN, DAY, EVE, or NIght. The
set point temperature will appear in the right side of the display. In the
winter, set the system switch to HEAT to control your heating system. In
the summer, set the switch to COOL to control your air conditioner. In
spring and fall or when windows are open, you can set the system switch
OFF. Setting the FAN switch to AUTO automatically runs your system’s
fan during heating and cooling. Setting the FAN switch to ON runs your
system’s fan continuously even without heating or cooling.
NOTE
The FAN switch works only if your system
provides a wire for the Unit’s “G” terminal.
OPERATION
This thermostat is “armchair programmable” You can make any
program or setting changes with the thermostat body off or on the
wall thermostat base.
1. Remove fresh batteries from their carton.
2. Remove body of thermostat as described at bottom of first column.
3. Remove the battery clip and batteries.
4. Install two new Energizer
®
or DURACELL
®
"AA" size alkaline
batteries in the battery compartment. Observe the polarity marking
shown in the clip.
5.Place body back on the wall. Hook the bottom of the body onto the
base, swing the body up, and snap the body onto the base.
Installation is now complete. Be sure to turn the power back on to your
heating and /or air conditioning system. If this is the first time you are
installing batteries, the thermostat will display “SUN 12:00 AM”. Within
90 seconds the thermostat will begin to display the room temperature
alternately with the time. To correct the display, see “Setting the TIME
and DAY,” after you set the programs.
CAUTION
The Unit is protected against normal static electric discharges. However, in
extremely dry weather you should touch another metal object before the Unit to
avoid potential loss of programs.
Push in the RESET key. This sets the built-in heating and cooling programs.
To review the built-in programs,press NEXT or PREVIOUS repeatedly; when
you are done, press RETURN.
You can use the built-in programs as shown, or change them as you wish.
Each day is divided into four periods. Each period has its own starting time
and temperature.
THE BUILT IN ENERGY STAR
®
PROGRAMS
PERIOD HEAT COOL
MON-SUN
MORN 6:00 AM 70° 6:00 AM 78°
preprograms DAY 8:00 AM 62° 8:00 AM 85°
EVE 6:00 PM 70° 6:00 PM 78°
NIGHT 10:00 PM 62° 10:00 PM 82°
PROGRAMMING THE UNIT
You can change any preset times and/or temperatures to suit your
schedules for the weekday, Saturday and Sunday programs.
Each period (Morning, Day, Evening, and Night) is programmed for
HEAT and for COOL.
Select HEAT to
program the unit for
controlling your heater.
Select COOL to program
the unit for controlling your
air conditioner.
OR
3


