


Architectural Decorative IS:CCLPS602P
Page 3 of 4 Instruction Sheet for Assembly and Installation
Lightolier is a Philips group brand
631 Airport Road, Fall River, MA 02720 • (508) 679-8131 • Fax (508) 674-4710
We reserve the right to change details of design, materials and finish.
www.lightolier.com © 2008 Philips Group • A0908
Addressing the Luminaires
When using the DMX control input, you are required to set the base address for
the unit and configure the luminaires connected to it.
The base address for the supply will be the starting address for the first
luminaire connected to Output 1. You can also group more than one luminaire
to the same address or reverse the addressing sequence of the luminaires on
Output 1.
Setting Base Addresses
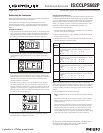
1. Press and release the UP or DOWN address buttons to step through the base
address. The address numbers 1 through 170 will appear in the display. Press
and hold either button to rapidly advance to the desired luminaire number.
Stop when the desired base number appears on the display. (See Fig. 6.)
3-Digit Display
UP
DOWN
Fig. 6
2. After selecting a base address, press and hold the UP and DOWN buttons
simultaneously to enter configuration mode. "CFG" appears in the display.
(See Fig. 7.)
CONFIGURATION MODE
Fig. 7
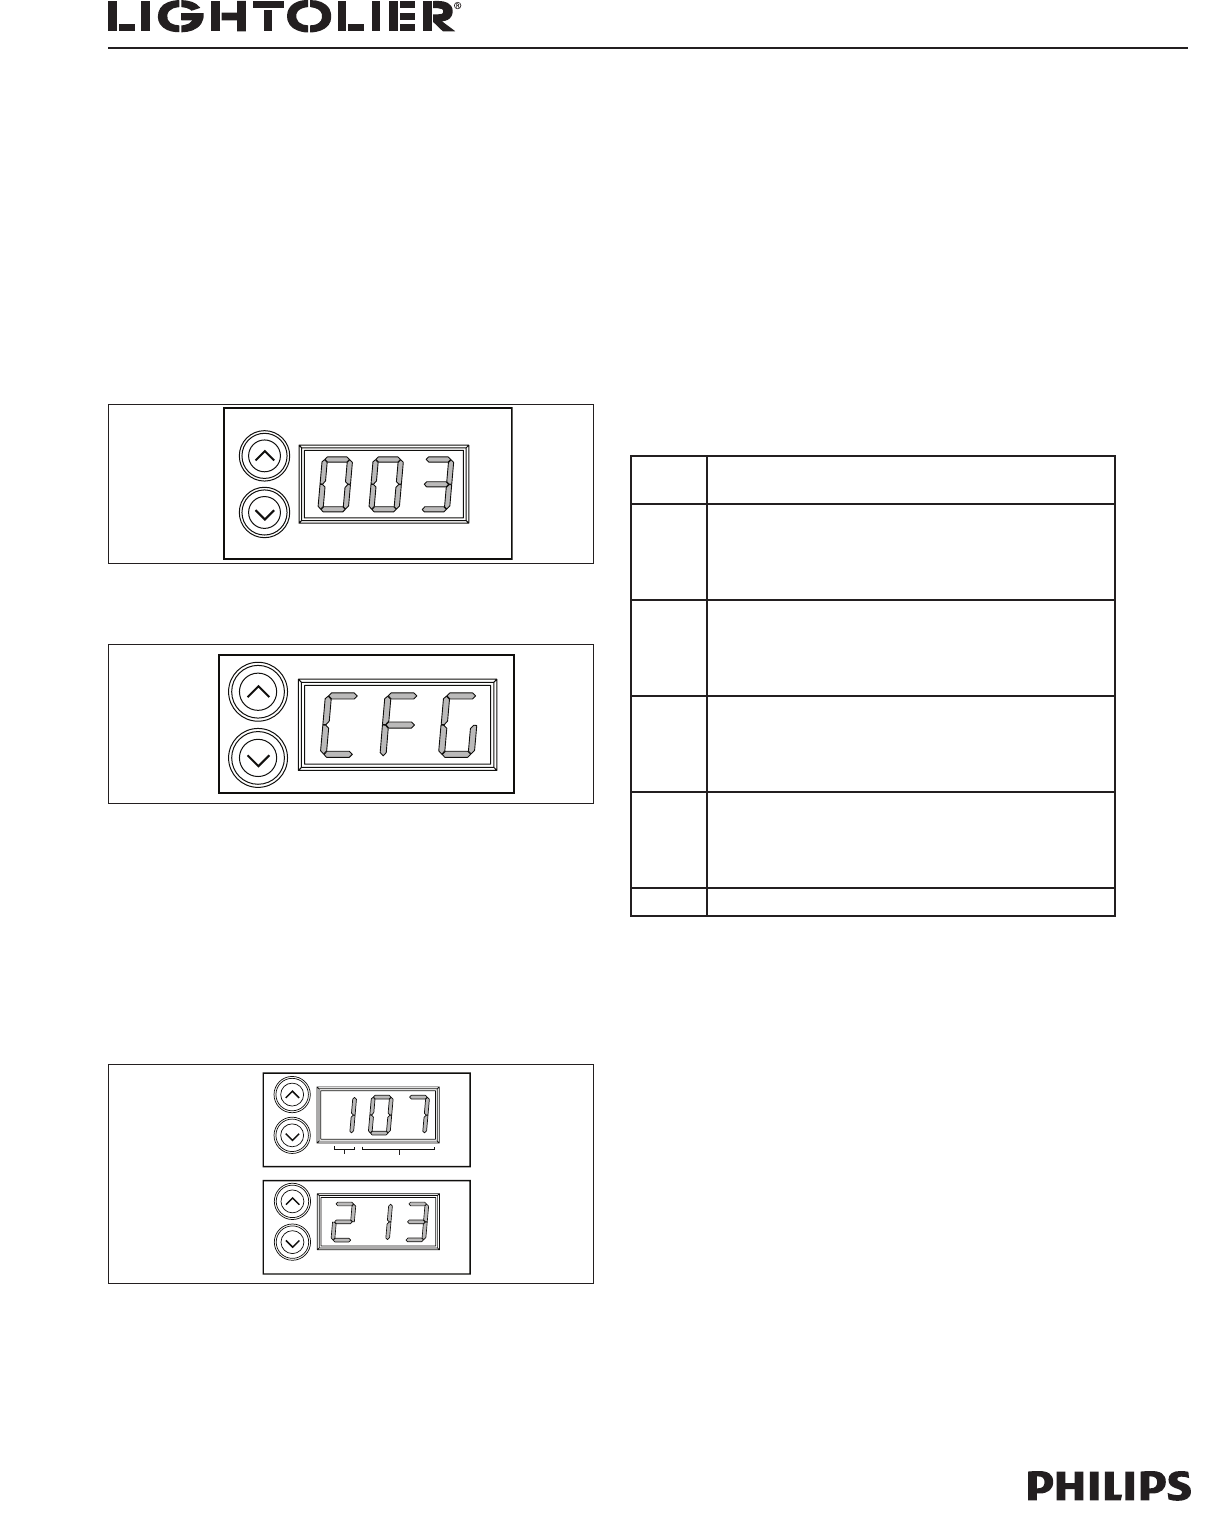
When entering Configuration mode, the unit automatically discovers all lumi-
naires that are connected and addresses them sequentially, beginning with
the base address on the first luminaire on Output 1 through the last luminaire
on Output 2. This step ensures that the unit correctly identifies all of the
luminaires connected to its outputs.
After the discovery is complete, two 3-digit numbers are briefly displayed.
The first digit indicates the output port and the last two digits denote the
number of luminaires connected to that output. For example, the number 107
represents 7 luminaires on Output 1, while the number 213 indicates 13 lumi-
naires on Output 2. If there are no luminaires attached to an output, the last
two digits are 00, as in 200. (See Fig. 8.)
OUTPUT NUMBER OF LIGHTS
EXAMPLE: 13 LIGHTS ON OUTPUT 2
Fig. 8
3. To exit Configuration mode, press both buttons simultaneously. The base
address for the unit will appear on the display.
Grouping Luminaire Addresses
CCLPS602P allows you to conserve the total number of luminaire addresses in an
installation by grouping luminaires together. When you group luminaire address-
es, you can assign multiple luminaires to the same address. The number of lumi-
naires per group is limited to the maximum number of luminaires connected to
Output 1. (For example, if you have 10 luminaires connected to Output 1 and 12
luminaires connected to Output 2, the maximum group number is 10.)
To set grouping of luminaire addresses:
1. Press and hold the UP and DOWN buttons simultaneously to enter configura-
tion mode. “CFG” appears in the display.
2. When entering Configuration mode, CCLPS602P automatically discovers all
luminaires that are connected.
3. Use the UP button to set a positive group number (the number of luminaires
per group), according to the following table.
Group
Address
How Luminaires Are Addressed
ALL ALL luminaires are assigned the selected Base Address.
If you have 20 luminaires with a Base Address of 1, they are ad-
dressed as follows:
Light #: 1 2 3 4 5 6 7 8 ... 18 19 20
Address: 1 1 1 1 1 1 1 1 ... 1 1 1
1 All luminaires are addressed sequentially, starting with the Base
Address. If you have 20 luminaires with a Base Address of 1, they are
addressed as follows:
Light #: 1 2 3 4 5 6 7 8 ... 18 19 20
Address: 1 2 3 4 5 6 7 8 ... 18 19 20
2 Every two luminaires are assigned the same address. For example, if
you have 20 luminaires with a Base Address of 1, they are addressed
as follows:
Light #: 1 2 3 4 5 6 7 8 ... 18 19 20
Address: 1 1 2 2 3 3 4 4 ... 9 10 10
3 Every three luminaires are assigned the same address. For example, if
you have 20 luminaires with a Base Address of 1, they are addressed
as follows:
Light #: 1 2 3 4 5 6 7 8 ... 18 19 20
Address: 1 1 1 2 2 2 3 3 ... 6 7 7
4 to 20 ...
Note: It is recommended that you set your group number to a number that
evenly divides the number of luminaires connected to Output 1 and you balance
the number of luminaires on each output. Otherwise, you may have a smaller
amount of luminaires at the end of each output port that would receive the next
address.
4. Use the DOWN button to set reverse addressing.
Note: CCLPS602P allows you to reverse the addressing sequence on Output
1 ONLY.
Using reverse addressing, the last luminaire on Output 1 receives the Base
Address, and then the addresses are assigned sequentially from the last
luminaire to the first.
Reverse addressing is particularly useful if you mount your power supply in
the center of a linear feed or if you want to feed an installation that uses
multiple power supplies from each side. Use reverse addressing to chase
from one end of the luminaire run to the next. (See Fig. 9 for examples.)
Use the DOWN button to set a "negative" group number, according to the fol-
lowing table. Set a negative group number to use reverse addressing.