


Component Operation and Maintenance
56
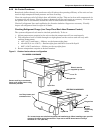
Replacing the Canister
Over a period of operation, the humidifier electrodes become coated with mineral solids. This coating
insulates the electrodes and decreases the current flow. To maintain humidifier capacity, the water
level slowly rises to expose fresh electrode. Eventually, the entire electrode becomes coated and the
water level reaches the top. At this point, the canister full alarm is activated and the output begins to
fall. When this happens, it is necessary to replace the full canister.
To replace the canister:
1. Turn off the humidifier by lowering the humidity setpoint below the ambient humidity level.
Record the original setpoint.
2. Place the RUN/DRAIN switch in the DRAIN position to drain the water from the canister.
3. Return the RUN/DRAIN switch to the RUN position after the canister has drained.
4. Turn OFF the power at the main unit.
5. Remove the cover from the humidifier cabinet.
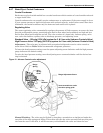
6. Locate the power wires to the steam canister. They are connected to the canister with 1/4" quick
connects. Make note of the wiring configuration before removing any wires. Refer to the schematic
on the unit. Slide the rubber boot back to expose the connections. Remove the three power wires
and the two canister full wires. Do not loosen the screws that secure the electrodes.
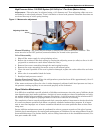
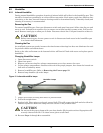
7. Loosen the steam outlet hose clamp and slide the steam hose away from the canister top fitting.
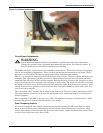
8. The canister is now ready to be removed. Pull the canister straight up and out of the cabinet
toward you.
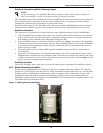
9. Replace the canister with the part indicated in Table 20.
10. Replace the canister by reversing the above procedure. Make special note of the following:
!
WARNING
To avoid a shock hazard, all power to the unit must be disconnected before proceeding with
the canister replacement procedure.
!
CAUTION
The canister and steam hose may be hot! Allow time for the humidifier to cool before
replacing parts.
Table 20 Humidifier canister part numbers
Part
Number Voltage
Capacity
lbs/hr (kg/hr)
136798P1 200-460* 11 (5)
136798P2 380-575 11 (5)
* Can operate on 575 V unit with transformer
NOTE
When replacing the canister:
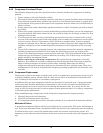
1. Make sure the two “O” rings are lubricated and properly seated on the bottom neck.
2. Always check the fill and drain solenoids for proper operation.
NOTE
When replacing the wiring, connect the red wire from terminal #1 on the interface to the red top
terminal on the canister. It is in the middle of a group of three terminals. The black wire from
terminal #2 on the interface connects to the power terminal farthest from the red terminal/
wire. The power wire to this terminal is routed through the current sensing coil.