


—7—
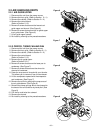
2.2.3 MOTOR
1. Disconnect the unit from the power source.
2. Remove the front grille. (Refer to Section 2.1.1)
3. Remove the cabinet. (Refer to Section 2.1.2)
4. Remove the control board. (Refer to Section 2.1.3)
5. Remove the air guide upper. (Refer to Section 2.2.1)
6. Remove the compressor, turbo fan, fan and
shroud. (Refer to Section 2.2.2)
7. Remove 2 screws that secure the motor to the motor.
(See Figure 10)
8. Remove the motor.
9. Re-install by referring to the procedures above.
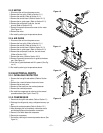
2.2.4 AIR GUIDE
1. Disconnect the unit from the power source.
2. Remove the front grille. (Refer to Section 2.1.1)
3. Remove the cabinet. (Refer to Section 2.1.2)
4. Remove the control board. (Refer to Section 2.1.3)
5. Remove the air guide upper. (Refer to Section 2.2.1)
6. Remove the compressor, turbo fan, fan and shroud.
(Refer to Section 2.2.2)
7. Remove the motor. (Refer to Section 2.2.3)
8. Remove 2 screws that secure the air guide to the base
pan. (See Figure 11)
9. Push the air guide backward and lift it upward. (See Fig-
ure 11)
10. Re-install by referring to the procedures above.
2.3 ELECTRICAL PARTS
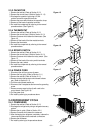
2.3.1 OVERLOAD PROTECTOR
1. Remove the front grille and cabinet. (Refer to Section
2.1)
2. Remove the nut which fastens the terminal cover.
3. Remove the terminal cover.
4. Remove all the leads from the overload protector.
5. Remove the overload protector.
6. Re-install the components by referring to the removal
procedure above.(See Figure 12 and 13)
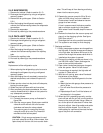
2.3.2 COMPRESSOR
1. Remove the front grille and cabinet. (Refer to Section 2.1)
2. Discharge the refrigerant by using a refrigerant recovery sys-
tem.
3. Remove the overload protector.(Refer to Section 2.3.1)
4. After discharging the unit completely, unbrace the suction
and discharge pipes at the compressor connections.
5. Remove 3 nuts which fasten the compressor.
6. Remove the compressor.
7. Re-install by referring to the removal procedure above. (See
Figure 14)
Figure 10
Figure 12
Figure 13
Figure 14
Figure 11